Lines and Vehicles
The core of every company in the transportation segment is the disposition of vehicles on routes. This page covers the management aspects for both lines and vehicles.
Line Management

A line in Transport Fever 3 is a list of stops, e.g. train stations and waypoints. A vehicle assigned to a line will try to travel from one stop to the next. When the last stop is reached, it will travel back to the first stop in the list. A line should consist of more than one stop if any cargo or passengers are to be transported.

In the above example, the line has four stops. A train travels from Tokyo Station to Tehran Station to Izmir Station to Tehran Station, and then back to Tokyo Station. Instead of traveling a route back and forth, it is possible to create lines like from A to B to C to D and then back to A. Such circular lines might be helpful in some situation when transporting cargo across the map or for bus lines in towns. For long distance passenger lines, it's unlikely that such a circular line is helpful as most passengers want to return where they came from at a later point of time.
If the network grows and multiple trains are running on one line or multiple lines on one track, the use of signals is recommended. Please refer to the signaling guide to find out more.
The segment between line stops can be further customized by adding waypoints which are locations that vehicles will pass through before continuing on to the next stop. The 3D preview of the line will show the expected route that vehicles on the line will take.
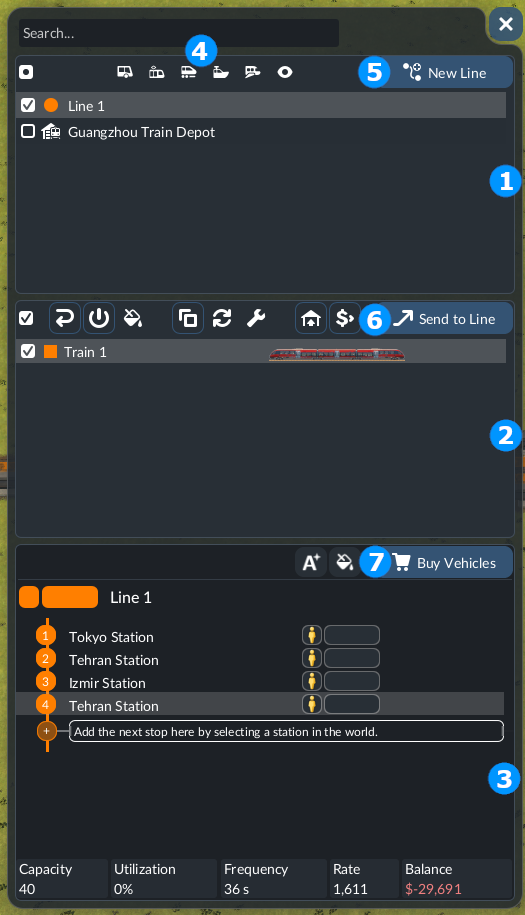 To create and manage lines, select the line manager in the toolbar. The line manager window contains three areas, the top is a list of all lines and depots 1, in the middle is a list of vehicles of selected lines and those that were manually added by selecting them in 3D 2, and finally an overview of the selected lines and depots at the bottom 3.
You can find selection boxes to the left of the top two areas to control what is shown in the areas below. Select a line in the top area for example and all vehicles currently on that line will be shown in the middle area. The bottom area will then show the stations and waypoints of the selected line along with an overview of statistics about the line. Vehicles in the middle area can also individually be selected and, for example, sold or re-assigned to a different line. When multiple lines or depots are selected, information about all selected entities will be displayed.
To create and manage lines, select the line manager in the toolbar. The line manager window contains three areas, the top is a list of all lines and depots 1, in the middle is a list of vehicles of selected lines and those that were manually added by selecting them in 3D 2, and finally an overview of the selected lines and depots at the bottom 3.
You can find selection boxes to the left of the top two areas to control what is shown in the areas below. Select a line in the top area for example and all vehicles currently on that line will be shown in the middle area. The bottom area will then show the stations and waypoints of the selected line along with an overview of statistics about the line. Vehicles in the middle area can also individually be selected and, for example, sold or re-assigned to a different line. When multiple lines or depots are selected, information about all selected entities will be displayed.
The list of lines and depots can be filtered by different categories:
 shows only bus and truck lines.
 shows only tram lines.
 shows only train lines.
 shows only ship lines.
 shows only aircraft lines.
 shows all lines that are visible in the current viewport.
Entering anything into the search field will be applied in addition to any other filters. Filters can be toggled by clicking the relevant filter buttons 4. Filters can be combined as desired. De-selecting all filters will show all lines and depots.
When one or more lines are selected by checking the corresponding checkboxes, only those lines will be displayed in 3D. When one or more vehicles are selected, their HUD icons will blink.
Selecting a single line will show details about that line in the bottom area. You can select a single line either by de-selecting all lines except for one or by clicking on the part of that line's row in the top area that has the line's name or empty space.
Lines can be renamed, deleted or located with additional buttons that show up when the row of the line is hovered. Depots can be renamed, located or the vehicle store can be opened for that depot with additional buttons that show up when the row of the depot is hovered.
Vehicles can be renamed, located or removed from the middle area with additional buttons that show up when the row of the vehicle is hovered.
Line Stops can be renamed, located, have their configuration adjusted, can be moved, can have alternative terminals selected or can be deleted with additional buttons that show up when the row of the stop is hovered. They can additionally be re-arranged by dragging on the handle icon at the beggining of that stops row.
Clicking on a stop or waypoint will select the directly following line segment. It will also blink in 3D.

- A new line can be created by selecting the New Line button 4 or by clicking on any station in 3D when no line is selected.
- To buy vehicles and assign them to a line directly, you can use the Buy Vehicles button 6, which will find the nearest compatible depot and open the store using that depot.
Manage Vehicles
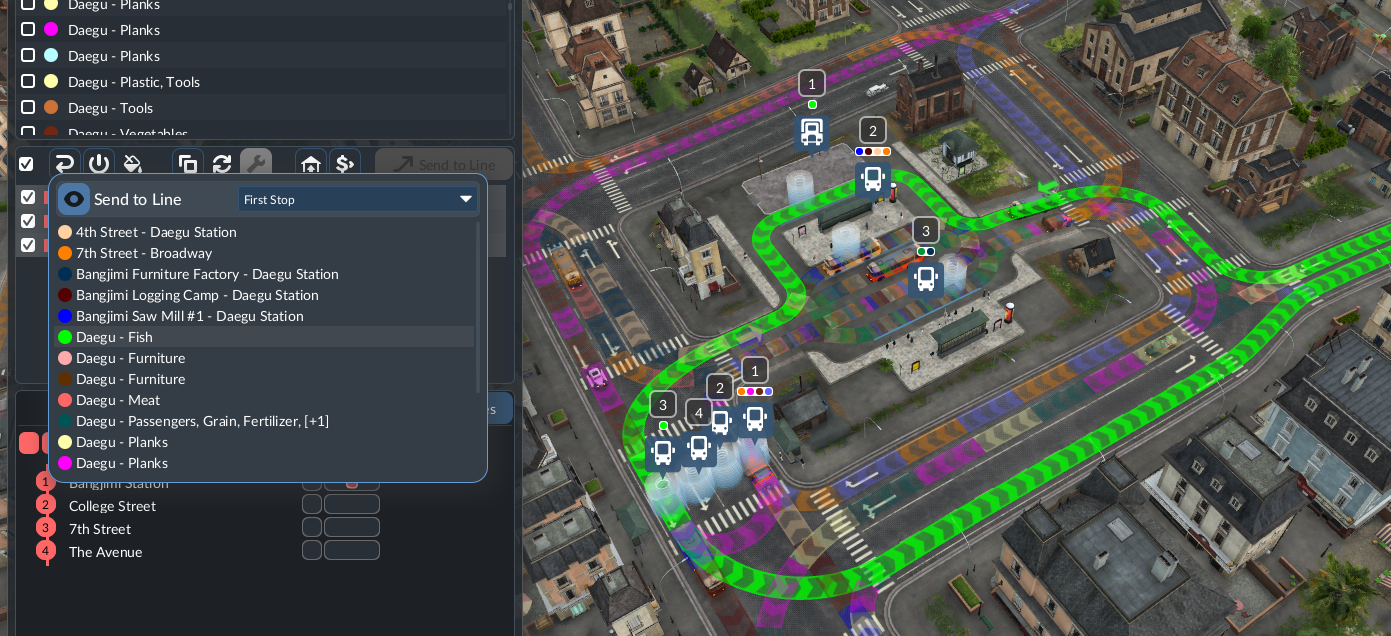
The section in the middle 2 offers various options for vehicle management. To apply an action to multiple vehicles, they have to be selected in the vehicle list. Selecting a line or a depot in section 1 will automatically select the vehicles and add them to the list. The action buttons are located in the top bar in section 2. The available actions depend on the vehicle type and whether the vehicle is currently waiting in the depot or running on a line:
 sends selected vehicles to a line and then selecting a line in the dialog or by clicking a line in 3D. The colored square next to a vehicle shows which line it belongs to. Hovering a line will highlight it in 3D. When sending vehicles to a line, the first stop that new vehicles will move to after being assigned can be configured using the drop-down menu.
 sells the selected vehicle(s) after confirmation.
 sends the vehicle(s) to the next reachable depot.
 allows rearranging of trains by moving wagons in trains and between selected trains. The trains can be extended in this menu too.
 completely replaces the vehicle(s) with a new vehicle type. The menu is similar to the vehicle purchase window.
 creates a clone in some compatible depot. This might not be connected to the line of the cloned vehicle.
 allows to select the color for vehicle(s) or whole train(s).
 reverses the direction that vehicles travel on the line.
 stops all selected vehicles.
Vehicles can't be transferred from depot to depot directly, so make sure to buy them in a depot, from which they are able to reach their intended destination. However, if a vehicle is sent back to the depot, it will not go back to the depot it was bought, but to the nearest reachable depot.
Adding and Removing Stops
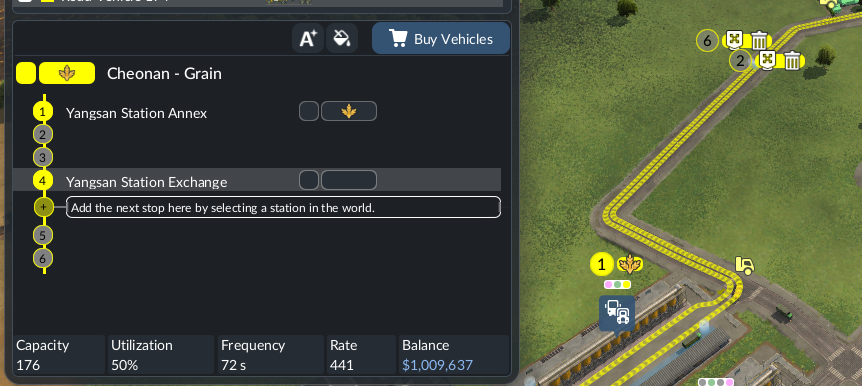
In the bottom area is a detailed list of the line showing stops and waypoints. Each line represents one stop or waypoint. The highlighted row is the currently selected line segment. The next stop or waypoint will be inserted directly after that stop or waypoint. To add a stop, simply click a station's model or HUD icon in 3D. To add a waypoint instead, hold down the SHIFT key while clicking a valid location The hint in the bottom area will give you a preview of what will happen to the line.
 and then hovering the inspector dot over a station. Pressing
  will add a stop at that station. To add a waypoint instead, hold
  before pressing
  at a valid location.
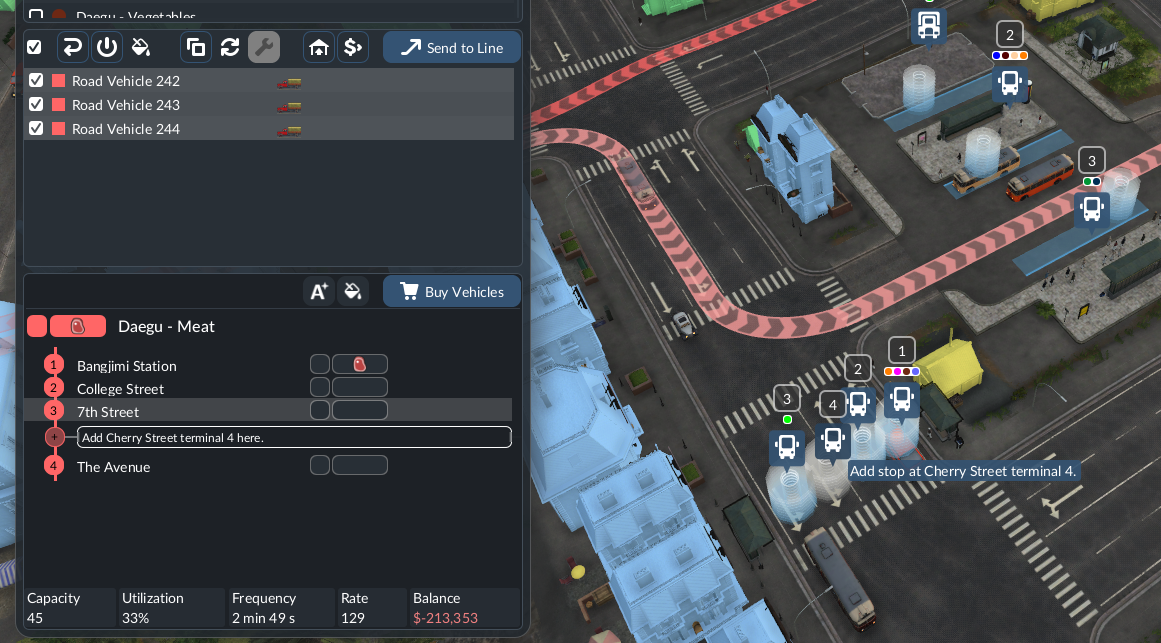
To remove a stop, navigate to the  button at the end of each stop or waypoint's row. The button only appears when hovering the row of the stop or waypoint.
Terminal Assignment
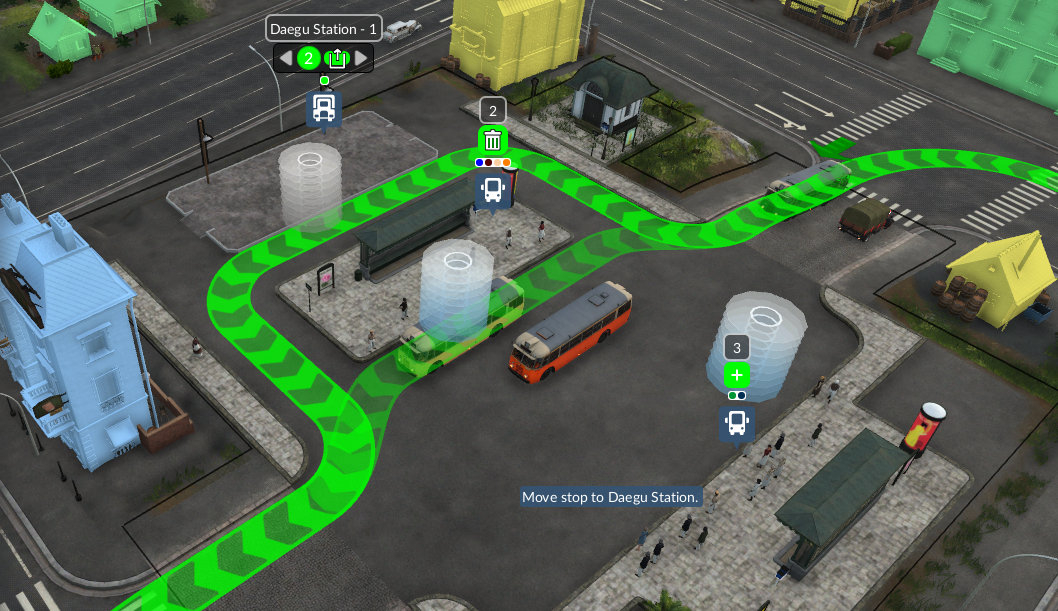
Terminals are assigned automatically to each stop of a line based on the reachable platforms and their utilization. To manually adjust the terminal assignment, select the move stop button in the stops row in the bottom area of the line manager 1 or in the HUD and then selecting a location to move to.

Alternative Terminals
Alternative terminals are used, if the primary terminal is occupied, when a vehicle approaches a station. When enabled, they will often increase the throughput of a station, as multiple vehicles of the same line can stop at the station at the same time at different stops.
The decision point of which terminal to use is different for the different vehicle types:
- For trains it is the last signal before the station. This signal is marked with a blinking arrow in the color of the line, while the line object window or line manager is open. All enabled alternative terminals must be reachable from this signal, otherwise a warning will be shown.
- For road vehicles it is the entrance of the station.
- For ships it is the waiting point slightly outside of the harbor.
- For aircraft it is the end of the runway.
The path to an alternative terminal is rendered with more transparency in 3D.
To enable alternative terminals, select the alternative terminal button  and configure the terminals that may be used as an alternative to the primary terminal. It is also possible to click on the plus above a terminal in 3D when moving a stop to add an alternative terminal or the to remove an alternative terminal for that stop.
Connection Problems
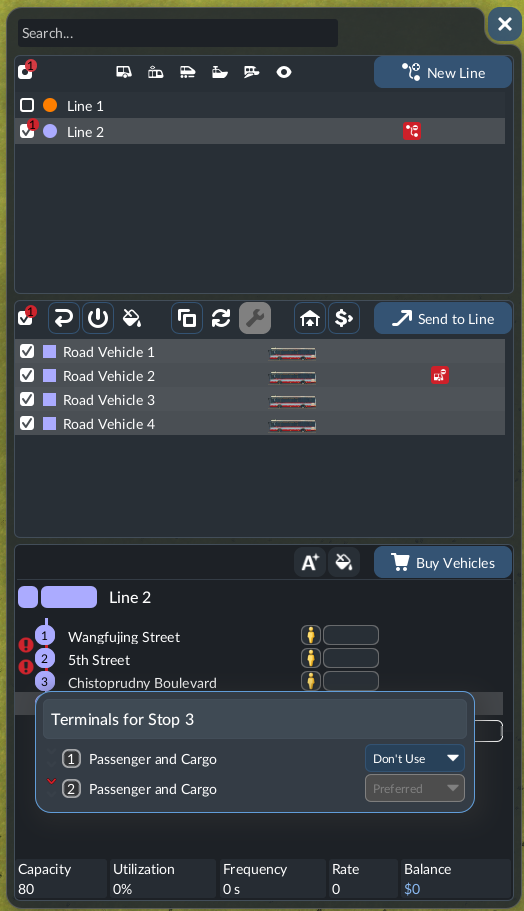 If some terminals can't be reached from the stop before or the next stop can not be reached, the line has a connection problem. A problem notification icon will appear next to the line in the top area of the line manager. A red bubble with the number of lines with problems is also shown next to the topmost checkbox, which lets you select or de-select all lines and depots.
The segments with connection problems are marked with a red exlamation mark in the bottom area of the line manager if the problematic line is selected. Hovering the icon will display a message that gives more details on the connection problem. In the Select Terminals dialog opened with the button an arrow appears next to the relevant terminal, showing if a connection problem exists when reaching or when departing the terminal.
Other line problems will receive a problem icon as well. For Example adding the same station twice in a row or adding a stop at a station of a different carrier will result in problems.
Keep an eye on the warning icon at the top edge of the screen. Problems with lines are listed in the warning window too. They might be caused outside of line management by changing tracks and signals!
Waypoints
Trains, street vehicles and ships will always use the shortest route to travel from one stop to the next. But sometimes it can make sense for the player to adjust this behavior, e.g. for traffic regulation, controlling vehicle noise impact or utilizing maintenance buildings. The player can influence a route by placing waypoints and adding them to the stop list of its line (similar to stations). As with stations, the vehicle is obligated to visit the waypoint and thus changes its route, if the waypoint was not placed on the previous shortest route. Vehicles will not stop at waypoints.
Loading and Unloading
Loading speed
 An important aspect when it comes to loading and unloading is the length of a platform in comparison to the length of trains and trams using that platform. If a platform is shorter than the train currently using it, the loading and unloading respectively will be slowed down. If this is the case, the vehicle window, the station window and the select terminals dialog will show an appropriate warning.
Loading speed varies per cargo type and is displayed in % in the vehicle window. Loading speed modifies a vehicle's base loading speed which can be seen in the vehicle window or in the vehicle store. Hovering the row of that cargo's loading status will show a more detailed breakdown of the loading speed and modifiers to it.
Loading speed is also influenced by a the vehicle's specialization, the terminal's specialization and where applicable, a warehouse's specialization. With matching specializations giving a speed bonus and mismatched specializations giving a malus. Whether a vehicle is loading at normal, increased or decreased rate can be seen by the color of the loading HUD indicator while the vehicle is loading.
It is possible to fine-tune the behavior of vehicles at stations in various ways:
- How long should the vehicle wait until leaving the station?
- Which type of cargo should be loaded and to what percentage of a vehicle's total capacity?
- An additional wait time can be configured that allows vehicles to wait additionally after loading or unloading to better distribute vehicles evenly on the line. The simulation aims to distribute vehicles evenly on the line using this extra time.
Cargo Filter
A stop's configuration can be set per stop in the line manager's bottom area by clicking on the configurestop button or that stops cargo icons in the window or in the HUD. Each stop can have any combination (or none) of cargo types configured to load, each with a load percentage. Which cargo is configured for each stop can be seen at a glance in the bottom area of the line manager as well.
Cargo is unloaded at each stop of a line where consumers of a cargo type that the vehicle stopping there is carrying, for example if a vehicle carries logs and the next stop is at a sawmill or near a warehouse is configured to store logs, then logs will be unloaded to the relevant location automatically. Stations inside an industry are always specialized to the cargo that is required at that industry.

Departure configuration
There are three modes available regarding the time to stay at a station:
- Load if available: The vehicle will stop and load any compatible cargo
- Full load (any): The vehicle will stop and wait until one cargo type is fully loaded.
- Full load (all): The vehicle will stop and wait until it is fully loaded.
Note that in the vanilla game “all” and “any” only applies to trains and ships, they are the only vehicles that have separate compartments or wagons and thus can load multiple cargo types at once. Any other vehicle type will wait for full load in both cases.
Line Details Window

The line window is divided into four main sections, and a color picker right below the top bar and an action button bar in the bottom.
Basics
The basics element shows the entire capacity and all cargo that is currently loaded on the line, as well as the rate and the frequency. Below, the current noise and pollution are shown.
Transported
This expandable section shows the absolute number of transported items/passengers transported last year. If expanded, the graph displays this number for an extended time.
Vehicles
This section displays all vehicles on the line. The vehicles can be located by selecting the locate button.
Balance
In the last section, the balance chart is shown. This chart contains the running costs and income for an extended period and the number for the last year. If the blue bar is higher than the red bar in the chart, then the line was profitable in the given year.
Action Buttons
The manage line button opens up the line in the line manager view. Lines with trains and trams have additional buttons in the lower right corner to select the priority of the line.
Station Details Window

The station window shows the capacity of each terminal and of all combined waiting halls. When a station is overcrowded, then passengers will start to leave the station. For each terminal, its specialization is shown as well as a warning if it is too short for optimal loading of some vehicles of a line passing through it.
In addition, the number of unhappy passengers is shown for each line. If there is a large number of unhappy passengers, the rate of the line should be increased, e.g., by adding more vehicles or replacing them with higher capacity or faster ones.
Below the line overview, the statistics graph is displayed. This graph shows the number of passengers that were loaded and unloaded over a period.
In the bottom bar, there is the configure button. Selecting this button opens up the module builder, and the existing station can be modified by adding or removing modules.
Vehicle Details Window

The vehicle window gives a detailed overview of the state of the vehicle. The window is divided into these section:
- Camera view
- Basics
- Condition
- Balance
- Action buttons
Camera View
In this view, we show in the lower right corner the current state of the vehicle. Its current speed or state if it is driving or detailed information about loading/unloading. In the bottom right is a button to enter this vehicle's cockpit camera. The bottom left shows all specializations that the vehicle has.
Basics
The first entry in the basics section shows the line to which the vehicle is assigned to, and it shows the most important info of the line, which are the rate and the frequency. Below, the current cargo/passenger load and capacity are displayed.
Condition
This section shows how well the vehicle is maintained and how the maintenance state affects the vehicle properties. Both sections can be expanded. Expanding the top section displays the maintenance history of the vehicle. Expanding the lower section gives information on the vehicle model and current modifiers to its stats for example due to its condition. Please refer to the Stations and Depots section for more details on maintenance.
Balance
This graph gives an overview of the running costs and income that this vehicle generates. If the blue bars are higher than the red bars for a given year, then the vehicle is operating profitably.
The action buttons in the lower part have the same functionality as described in the "Manage Vehicles" section above.
Vehicle Store Window

The vehicle store window has a slightly different layout for each vehicle type. Vehicles that are always functional on their own are trucks and buses, ships, planes, and helicopters. These have a simpler store layout. Vehicles that can be combined to form a consist, such as trains and trams, have a store window that offers more functionality. The vehicles available for purchase are shown in the list in the left column 1. If there are multiple categories available, then several tabs are displayed in the top row 2. For example, in the train store, it is possible to switch between locomotives, wagons, and multiple units. Additionally, a search functionality is always offered 3. In the upper right column, there are the sorting options 4. The button left of the sort options toggles between descending and ascending sorting, and in the drop-down menu, the property to sort by can be selected. The cargo bar 5 consists of buttons that can be applied to filter the vehicles in the list by cargo type. One or multiple cargo buttons can be selected to search for vehicles that can transport all the selected cargo types.
This detailed overview on the right 6 shows the most important features of the selected vehicle and the color-picker button to choose the color of the vehicle. The key data are displayed on the vehicle photo: cost, maintenance cost, availability, and the cargo specialization. The table below the image shows detailed properties that may directly affect the town ratings. Among these are pollution, noise, passenger comfort, loading speed, and technical data.
The consist can be modified in the lower section (for trains and trams only) 7. Here, individual units can be moved and removed. Finally, the vehicle can be purchased by either double-clicking on the row in the list or by selecting the large button 8 in the lower right corner. An amount can also be specified.