Streets and Tracks
Streets and tracks are essential to build a comprehensive road and rail network in the game. Streets are automatically built when a new game is created, so that towns and industries can directly be connected. In contrast, tracks can only be built by the player. Streets are also automatically built and upgraded when towns expand. In contrast to tracks, the player usually does not own streets (even if they have been constructed by the player). Towns can construct new town buildings along streets and AI controlled cars and pedestrians can use them without restrictions.
The construction costs are a combination of:
- costs per meter (depending on street/track type)
- costs for terrain terraforming
- costs for bridges (depending on the height above ground)
- costs for tunnels (depending on the depth below ground
- costs for upgrades like railroad catenary
Streets and tracks have speed limits, depending on the type used. On curved tracks, the speed of trains is also limited by the curve’s radius. A smaller radius will result in a lower top speed. Rail bridges have an additional speed limit, which may lower the speed limit of the used tracks. The top speed of tracks is displayed while constructing tracks and can later be seen in the according data layer.
See the list below for detailed information on costs and speed restrictions.
Streets

The street construction menu can be reached by selecting the Roads button in the toolbar.

Building and Replacing Streets

There are 5 main categories for roads 1:
 Small streets are two-lanes streets with a pedestrian sidewalk. They usually are built in towns and town buildings can spawn along them. They exist either as one-way or two-ways variants and with various upgrades such as bus-lanes, noise barrier or trees. Those upgrades can be added or removed later.
 Medium streets are four-lanes streets with a pedestrian sidewalk. They usually are built in towns and town buildings can spawn along them. They exist either as one-way or two-ways variants and with various upgrades such as bus-lanes, noise barrier or trees. Those upgrades can be added or removed later.
 Large streets are six-lanes streets with a pedestrian sidewalk. They usually are built in towns and town buildings can spawn along them. They exist with various upgrades such as bus-lanes, noise barrier or trees. Those upgrades can be added or removed later.
 Country Roads streets have higher speed limits. They usually are used for connections between towns. No new houses spawn along them and are available with a variety of lanes.
 Highway streets have the highest speed limits. They are used for fast connections between regions of the map. No new houses spawn along them.
Vehicles will make best use of all available lanes depending on their destination - if multiple lanes are available to the same destination, faster vehicles will make use of the additional lane(s) in order to overtake the slower one.
The main part of the window is the list of available street types 2. The search bar can be used to filter by name 3. When selecting a road to build, a menu allowing to select one of the three build modes and to configure the road also opens on the left of the screen.
Building new Streets
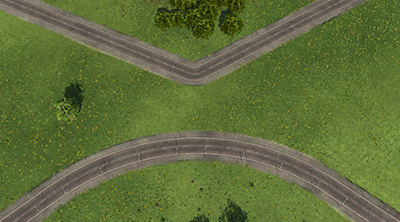
curves of straight and curved mode
 construction tool guidlines 45° and 90°

slope gradient selection

bending with M and N

There are two modes available for building new streets selectable on the side panel.
With the straight building mode  the street forms a straight connection between the start and end point. The only exception is when streets are pulled from existing streets or intersections and built parallel to an existing street. This behaviour can be overridden by using the Precision Mode by holding SHIFT.

In contrast, with the curved building mode  , as the name indicate, you can built curved streets. To do so, the first step is to define the direction of the street, then validate it by pressing the left mouse button. Once the direction is set you can place the end point in the same way.

For easier alignment during road construction make use of the 45° and 90° guidelines that show up automatically when extending an existing road segment or align it to any angle in between by simply moving the mouse a bit further.
To build a new street segment, click at the place where it should start and click again at the place where the street segment should end. The street will be built immediately.
If buildings have to be demolished to build the street, a yellow warning message will pop up and the buildings will be highlighted in yellow. It also is possible to cancel the construction of the road by pressing ESC or by right clicking.
The streets usually snap to existing streets if they are close enough. The area in which this effect occurs can be reduced by holding SHIFT while dragging the street. The street will snap to a straight segment when aligned within a few degrees. This can be disabled by holding SHIFT too.
Using the panel on the left side of the screen, it becomes possible to control the street with the following options:
Mode:
 Height Offset: In this mode, it becomes possible to control the height of the end point above the ground surface. If the height is changed before placing the first point, it becomes possible to control its height that way.
 Fixed Incline: In this mode, it becomes possible to control the slope of the street segment.
Additionally it is possible to control the height-wise curvature (bend) of the street. This can be used to create small bend bridges or force small tunnels as underpasses (see image). It is also possible to control the terrain following behavior for the height offset mode and adjust snapping behavior.
All those options are as well accessible through shortcuts that are listed on the bottom right of the screen.
Note that it is possible to enable a Drag-and-Confirm construction mode similar to how street building in Transport Fever 2 was function by going in the Advanced Settings. In this mode, the street isn't built immediately upon confirmation and it becomes possible to possible to move the end point to another place by picking up the grey circle (that is highlighted blue on mouse over) before validating.

In this mode, after placing end point, an arrow button  indicating the current slope appears at the end of the segment. By default, the street segment is aligned to the terrain height at the end position. When that arrow button is pressed, the fixed incline selection mode is activated. Then it is possible to manually select the desired slope gradient by using the
  and
and  buttons. With SHIFT pressed, the steps are smaller for finer control. By pressing on the slope indicator, the automatic slope alignment can be activated again. The construction is confirmed and actually built by pressing the
  button or by pressing the
  button to dismiss the current proposal.
Bridges and Tunnels


Whenever the distance of the street level to the ground level is big enough, a bridge or tunnel is proposed. The bridge and tunnel types can be selected for the entire proposal from the menu on the left side of the screen. Additionally, when using the Drag-and-Confirm construction mode, it's possible to change the type of bridge or tunnel used for a specific section of the proposal by clicking on the corresponding bridge or tunnel icon above the street before finishing the construction.
| Type | Max. Speed | Availability | |
|---|---|---|---|
 | No Bridge | ||
 | Stone Bridge | 90 km/h | from 1900 |
 | Steel Bridge | 140 km/h | from 1940 |
 | Suspension Bridge | 180 km/h | from 1940 |
 | Concrete Bridge | 280 km/h | from 1970 |
 | Cable-Stayed Bridge | 220 km/h | from 2000 |
 | Tied Arch Bridge | 350 km/h | from 2010 |
Note that bridges can also be built partially and curved. Enabling the manual slope gradient control described above will avoid an automatic adjustment to the ground. The same is possible with tunnels as soon as the street is far enough below ground level.
To create a tunnel or bridge directly use , respectively . at least 5 times before dragging.

Replacing existing Streets

To replace existing streets with a different type, select the street type with which the existing one should be replaced in the list 3 and activate the replace mode by clicking on the  button panel on the left of the screen 4.
 to enable the left panel and navigating to the replace road mode
Sections that do not have the selected street type are displayed in yellow, all others are blue. Usually the tool is applied to all sections entirely visible on the screen between two intersections or until the next street type change. If you like to modify only some sections, hold SHIFT while applying the tool. The affected sections are highlighted in blue as well.
In addition, it is possible to add or remove tram tracks or bus lanes at the same time. The default setting "keep" will replace the street type but keep bus lanes or tram tracks, if there are any.
Working with tunnels
To help working with tunnels, you can switch the game view to the Underground Mode, this is done by selecting the "Underground Mode" toggle in the left panel when building a street or a track, or by pressing G.
 +
+ 
while in Undeground Mode, it becomes possible to see tunnels and interact more easily with them. While Underground Mode is active, new streets and tracks will not snap with streets and tracks above ground, to do so requires to toggling Underground Mode off again. This can be done at any time, including while building street, the same way it was enabled.
Street Constructions
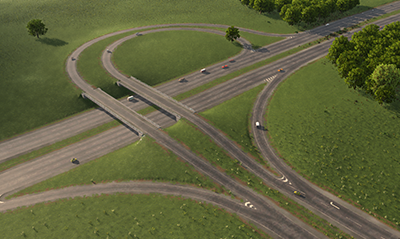
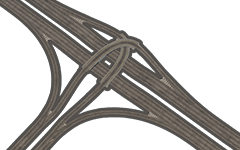
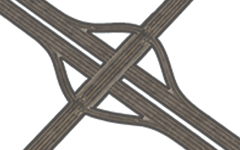
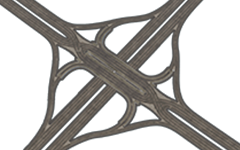
Switch to the ROAD CONSTRUCTIONS tab on the top 1 to get to the road constructions. These are template structures consisting of different streets. Once placed they are editable as if they would have been constructed by hand. Before being placed, some parameters like the number of lanes and the size can be set. There are several constructions available:



Modifying Streets
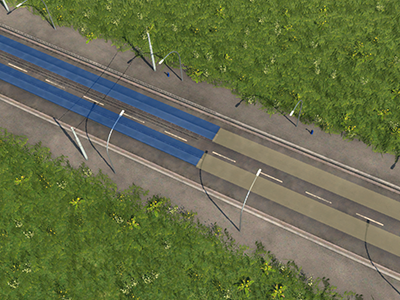
Switch to the TOOLS tab on the top 1 to get to the tools submenu. You can add or remove tram tracks with or without catenary as well as bus lanes. Bus lanes are generally not used by individual traffic. Also you can change if a street is owned by the player. Streets that are owned by the player are not automatically upgraded by towns, but you pay maintenance costs for them.
Usually the tools are applied to all sections visible on the screen between two intersections. If you like to modify only some sections, hold SHIFT while applying the tool. The affected sections are highlighted in blue as well.
In general, section of road or crossing that do not have the selected tool applied yet are displayed in yellow, all others are blue.
Crosswalk Tool
This tool allows to add/remove pedestrian crosswalks at crossing.
Alley and Noise Barrier Tools

These tools allow to add or remove Alley and Noise Barriers on the side of street:
- The Alley tool places trees on the side of the street which reduces the noises and pollutions emitted by vehicles using that street. It also lower the maximum speed of the road.
- The Noise Barrier tool adds noise barrier on the side of the road which significantly reduce the noise emission from vehicles using that road. It is however not possible to have buildings along a road where a noise barrier has been added.
Traffic Lights Tool
This tool allows to add Traffic light at crossing. Traffic lights can be further configured by closing the construction menu once the traffic light has been added and selecting it. This will open a new window showing the crossing phases and which lanes are part of the phase. It's then possible to configure in more details the behavior of the crossing.
Crossing Tool

This tool allows to configure the lanes at crossing, defining where and to which lanes vehicles are allowed to turn.
Street direction
While not a tool in itself, it's possible swap the direction of one-way streets and highways. While using one of modification tools or while using the replace mode with the same street type, hold CTRL.
 while applying the tool or replacing the street
Street Type List
| Type | Max. Speed | Lanes | Availability | Cost per m | ||
|---|---|---|---|---|---|---|
| |   | Narrow Street | 20 km/h 30 km/h | 2 | 1850 - 1940 from 1940 | 36 |
  | Small Street | 40 km/h 50 km/h | 2 | 1850 - 1940 from 1940 | 60 | |
  | Narrow One-Way Street | 50 km/h | 2 | from 1940 | 72 | |
 | Small One-Way Street | 50 km/h | 2 | from 1940 | 120 | |
| |   | Medium Street | 40 km/h 50 km/h | 4 | 1850 - 1940 from 1940 | 180 |
 | Medium One-Way Street | 50 km/h | 4 | from 1940 | 240 | |
| |   | Large Street | 60 km/h 60 km/h | 6 | 1850 - 1940 from 1940 | 80 |
| |   | Small Country Road | 60 km/h 80 km/h | 2 | 1850 - 1940 from 1925 | 180 |
  | Medium Country Road | 60 km/h 80 km/h | 4 | 1850 - 1940 from 1925 | 360 | |
  | Large Country Road | 60 km/h 80 km/h | 6 | 1850 - 1940 from 1925 | 540 | |
| |  | One-Lane Highway | 100 km/h | 1 | from 1940 | 180 |
 | Two-Lane Highway | 120 km/h | 2 | from 1940 | 360 | |
 | Three-Lane Highway | 120 km/h | 3 | from 1940 | 540 |
Tracks

Tracks are required for any train to be used. They connect stations and depots. The track construction menu can be reached by selecting the Tracks button in the bottom toolbar.

Building Tracks
alignment along existing tracks
 45° and 90° guidelines
Tracks building is very similar to street building. Select the track you want to build from the main panel of the Tracks menu. Doing so will open the menu on the left with similar options as street building. There are 3 types of track available, each with and without catenary:
| Icons | Type | Max. Speed | Availability |
|---|---|---|---|
  | Simple Tracks | 100km/h | from 1900 |
  | Standard Tracks | 160km/h | from 1930 |
  | High-Speed Tracks | 350km/h | from 1980 |
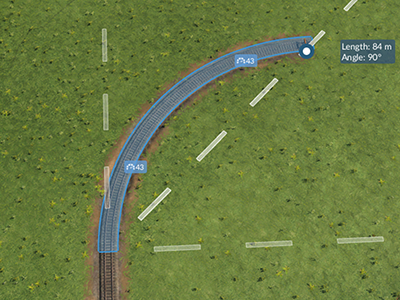
In contrast to streets, there is no distinction between straight and curved build mode. The build tool always tries to arrange the tracks in an arc in such a way that the transitions to existing track segments can be made without sharp bends. It also depends on the direction in which you drag the track after you have pressed the left mouse button. If you place the track end point to an existing end, it will snap there too at an appropriate angle. As the speed is restricted by the radius of the curves, small numbers indicate what the final speed restrictions in that area will be. Make use of the 45° guidelines in order to better align your tracks.
The placing and snapping behavior can be controlled in the same way as described above for streets. The same applies to the height adjustment of tracks. Keep in mind that tracks can't be placed as steep as streets and that there is a minimal curve radius for tracks. To see the contours of the terrain better, the contour lines are shown while building rails.
If buildings have to be demolished to build the tracks, a yellow warning message will pop up and the buildings are highlighted in yellow. Placing, confirming or cancelling track placement works in the same way as street building.
Advanced Track Layouts


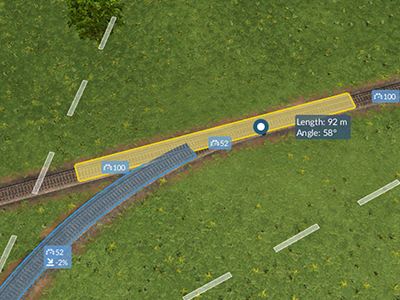
To build a parallel track, point next to an existing track (the cursor will turn blue and will snap close to the existing track), left click to place the first point and build along the existing track as normal, the end point will snap to a parallel position on the existing track when close enough. This can be repeated multiple times.
To build a switch, point at an existing track, where the switch should start, left click and build from there away from the existing track at a narrow angle and will allow vehicles using one track to continue on the other. Dragging at a large angle will create a crossing instead of a switch and won't allow vehicles to change track.
The technics of switches and parallel tracks can be combined to construct various types of switches and crossings:

1 Double Switch

2 Crossover

3 Extended Crossover
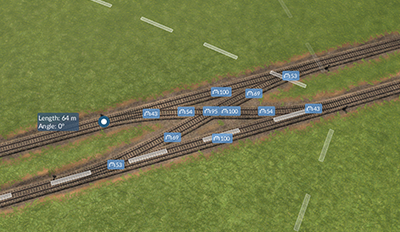
4 Diamond Crossover
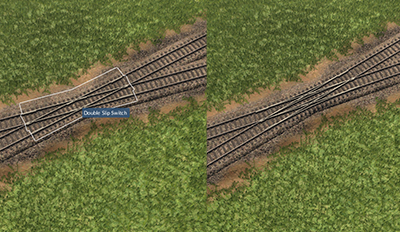
5 Double Slip Switch
 6 Three Way Switch
1 A double switch can be built by extending parallel tracks as a switch.
2 To build a crossover, point at an existing parallel track, where the crossover should start. Left click and drag in the direction where the crossover should go.
3 The same concept can be used to construct extended crossovers crossing multiple tracks.
4 To build a diamond crossover, point at the end of an existing crossover (the cursor will snap and turn blue). Left click and drag to the opposite side of the crossover.
5 To build a double slip switch, point at a crossing with a flat angle, left click and select Yes in the dialog. If the crossing is not highlighted while hovering it, the angle is probably too steep, and it cannot be upgraded.
6 A three way switch can be built by pointing at an existing track, where the switch should start. Left click and drag in the direction where the branch should go. Repeat from the same point to extend the tracks to the other side.
Rails and streets can be crossed in any way possible. Simply building a track over a street or the other way around to create a railroad crossing. You can change the crossing type either during the construction by selecting the type from the option panel on the left of the screen, next to bridge and tunnel type or afterwards by clicking on the crossing bars and selecting the new type.
Bridges and Tunnels
 Like with streets, whenever the distance of the track level to the ground level is big enough, a bridge or tunnel is proposed.
Selecting the tunnel or bridge type to adjust the look and maximum speed is done in the same as for street building. See the section above for a list of available bridges.
Like with streets, whenever the distance of the track level to the ground level is big enough, a bridge or tunnel is proposed.
Selecting the tunnel or bridge type to adjust the look and maximum speed is done in the same as for street building. See the section above for a list of available bridges.
Note that bridges can also be built partially and curved. Enabling the manual slope gradient control will avoid an automatic adjustment to the ground. Keep in mind that tracks can't be placed as steep as streets. Bridges can also be fitted with switches and signals. The same is possible with tunnels as soon as the track is far enough below ground level.
To create a tunnel or bridge directly change the height in the left options panel or use , respectively . at least 5 times before before starting the track construction.
Replacement of bridges and tunnels

To change the type of a bridge or tunnel is is not required to demolish a bridge or a tunnel for replacement. Simply click on the bridge or tunnel that you want to replace to open the bridge / tunnel selection window. Now select the new model of your choice and the cost for the replacement will be displayed in the REPLACE FOR button. Once clicked the bridge / tunnel model will be 1:1 replaced with the just selected type.
The cost of the replacement is dependant on the length and depth/height of the existing bridge as well as the type of the new bridge.
Modifying Tracks

Switch to the TOOLS tab on the top 1 to get to the tools submenu. From here can add or remove catenary and noise barrier. Sections that do not have the selected tool applied yet are displayed in yellow, all others are blue.
Usually the tool is applied to all sections visible on the screen between two switches or several hundred meters of track when there are no switches. If you like to modify only some sections, hold SHIFT while applying the tool. The affected sections are highlighted in blue as well.
Signals

Switch to the TOOLS tab on the top 1 to access the tools submenu and be able to place signals. Signals are used to split the track network in smaller parts so that more than one vehicle can be driving around safely.
Signals can be turned into one-way signals. Trains may only pass them if the signal is pointing in the direction of the approaching train. One-way signals are indicated by a symbol with one white and two black dots in the signal icon.
See the page about Railway Signals for more detailed information.