Map Editor
The map editor provides the toolset to import and export heightmaps, sculpt the landscape and place towns, industries and assets manually as well as by using automated generators. It is possible to import town and industry positions and generate the initial street network too.
You may edit downloaded maps from the Steam Workshop as well.
See below for a full description of the available features and information about how to play your own map and share it with other players.
Start Editor
To create a new map for the map editor, press the Map Editor card in the main menu. The menu is similar to the menu for new games. You may either start from scratch by selecting a climate or load an existing map.

New Map
To generate a new map, select your preferred climate for map generation. Then adjust the Settings similar to the ones when setting up a free game. This also includes the map size and format. The second tab Add Mods allows adding mods in the same fashion as for a free game.
By pressing the Start Map Editor button in the bottom right corner, the new map is started. If you like to get back to the climate selection instead, you may press the Back button in the top left corner.

Please be aware that it is not possible to change climate, map size and format in the editor itself.
Load Map
Instead of starting a new empty map, it is also possible to load a previously created map to edit it further. Load one from the grid below the climate choice by selecting its card. To access autosaves of the same map or adjust the gameplay settings or list of active mods, click on the  icon of the card.

Editor Interface
Basically the interface is the same as in the free game, but some tools are gone while others are exclusively available here. Read the interface documentation for the common tools. Not available are:
- Station and depot construction for all types of transport
- Track construction
- Vehicle and line management
- Warehouses and Perks
- Data layers associated with the tools above
Generate Heightmap

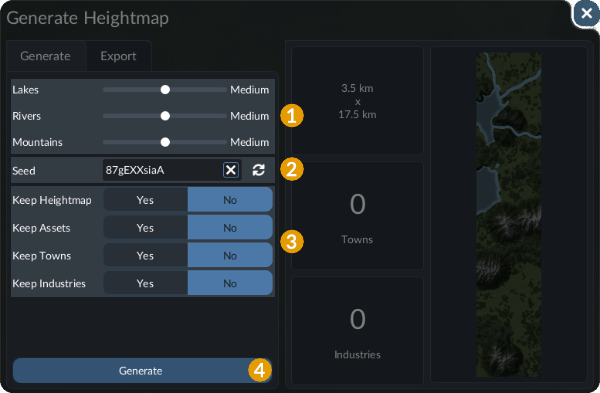
The heightmap generator tool can be opened by selecting the button that you can see on the left side. It can be used to generate a full heightmap including assets like trees similar to the generator for a free game.
Generate a Map
Select the Generate tab to prepare the generation of a new map.
On the left side you can select your preferences for map generation. Tweak the sliders and other options to adjust the generated maps according to your needs 1. At the bottom of the settings list is a textbox for the Seed 2. This value is a key for randomization. With the same seed and the same settings, a map will be created identical each time. Beside the vanilla generators, it is possible to add additional terrain generators with mods, you may find some at the Mod Hub. They all come with their individual set of options.
Below are four options to Keep Heightmap, Keep Assets, Keep Towns and Keep Industries from before when generating the new map 3.
By pressing the Generate button at the bottom, the map generation is started 4.
Export a Heightmap

To export a heightmap into a grayscale image, select the Export tab in the generator menu.
You can select an existing file to overwrite or enter a filename of your choice in the text box at bottom of the list 1. The heightmaps are exported as .png files, so you may either call your file with .png suffix or you do not add a suffix at all. See user data locations for more details or use the  button to open the file explorer of the operating system to get to the correct folder with the exported heightmaps on your system.
Below the list are two options 2. You can select the Grayscale Bit Depth and choose between 16-bit grayscale and 8-bit grayscale. When Biomes Data is enabled, additional textures with biome mask info are exported alongside the heightmap. They can be used for advanced import as described further below.
To start the export process, click the Export button at the bottom of the menu 3.
Import Heightmap
Transport Fever 3 allows the import of real world or externally generated heightmap data. To generate fitting assets and ensure proper terrain material distribution and sound, it is also possible to upload matching biome data masks. Both can be imported in the heightmap import menu accessible with the button in the toolbar.
Heightmap

If you like to import an existing greyscale heightmap into the game, select the Import tab of the import heightmap menu.
In Transport Fever 3, each pixel is has an equivalent of 4×4 meters in game. The optimal resolutions for heightmap files are listed in the map size documentation. The grayscale images need to be .png files and should have 16-bit grayscale values.
Select the heightmap file you want to import in the list on the left side 1. The files are taken from the heightmaps folder in the userdata directory. See user data locations for more details or use the button to open the folder.
Below the list are some options that you should set to the correct values 2:
Minimum Heightis the height of the full black pixels on the heightmap textures.Maximum Heightis the height of the full white pixels on the heightmap textures.Water Levelis the height of the water plane. It is recommended to aim for height 0 for the best results with the biomes and materials. Keep in mind, that Transport Fever 2 has a flat water level all over the map when preparing your heightmap.
The Keep Assets option allows to retain already placed trees and other assets when importing the heightmap. You can use the preview on the right to check the effects of the parameters above.
Press the Import button at the bottom to start the map generation 3.
Biomes
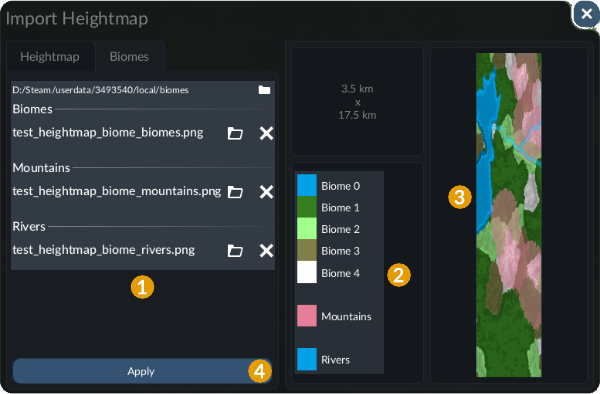
Depending on the generator used for the individual climate, there are different offered masks. Select the mask files you want to import for each of the entries in the list on the left side by using the  buttons or reset the selection by using the
 buttons 1. The files are taken from the
biomes folder in the userdata directory. See user data locations for more details or use the button to open the folder.
The Biomes mask is a grayscale mask where the range from 0% to 100% is divided in equally sized intervals depending on the number of biomes. The other masks are individual black/white masks.
The legend on the right side 2 lists all the different data masks with an assigned color for the map preview on the right side 3.
To use the masks for the currently loaded map, press the Apply button at the bottom 4.
To get a better understanding of the masks, it is recommended to generate a random map and export the biome masks from there.
Towns & Industries

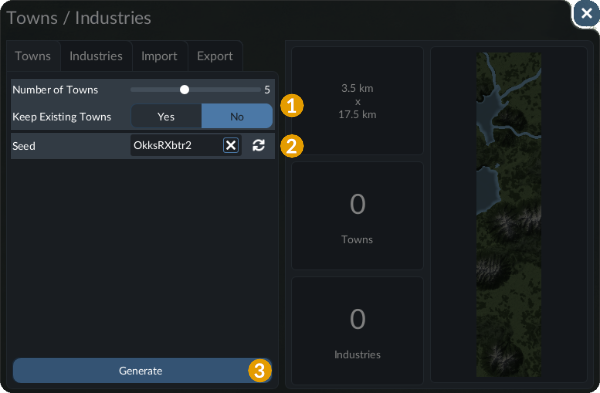
To automatically distribute towns and industries, another generator tool is available from the toolbar. Select the corresponding button to open it.
Generator
Both town and industry generation are used the same way. You may select the one you want to use by selecting the Towns or Industries tab at the top side of the menu.
On the left are some properties to configure the distribution 1. The slider allows you to specify how many towns should be generated. The maximum possible value depends on the map size. If you have already placed or distributed some towns on the map and want to use the automated tool again without removing them, enable Keep existing towns. As with the map generator, there is a textbox for the seed 2. This value is a key for randomization. With the same seed and the same settings, the town distribution on this map will be identical each time. You can use the preview on the right to check the effects of the parameters above.
The generation of towns can be started by clicking on the Generate button at the bottom 3. The procedural generation can be seen by small clouds of dust appearing at the positions where towns are placed.

The generation of industries uses settings analogous to the town generator.
Im-/Export
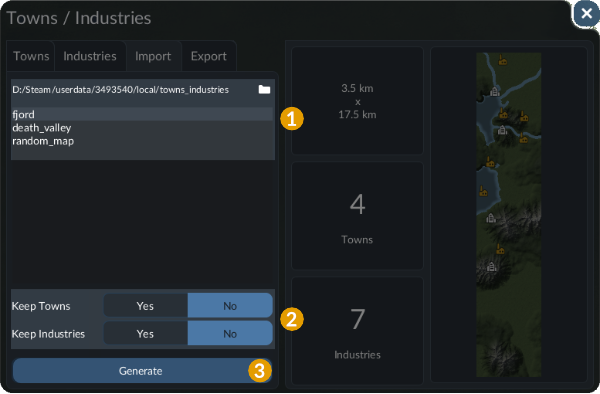
It is also possible to Import and Export a set of town and industry positions.
For the import, there is a list of files available in the towns_industries folder in the userdata directory. It can be opened by using the button 1. To import, select an entry of the list below and decide whether to Keep Towns and Keep Industries 2. The import can be started by pressing the Import button 3.
For the export, it is possible to either select one of the files to override or to specify a new file name at the bottom of the file list. The export can be started by pressing the Export button.
The content of the files follows the following structure:
function data()
return {
  industries = {
    {
      angle = -0.218669,
      fileName = "::/industries/farm/farm.con",
      onWater = false,
      position = { x = -1240, y = 3072 },
      tag = "farm",
    },
    ...
  },
  towns = {
    {
      landUse2CargoNeedsCategories = {
        com = { { "fish", 1, }, },
        ind = { { "machines", 0.5, }, },
      },
      name = "Gausdal",
      position = { x = -3239.97, y = -6574.89 },
      sizeFactors = { 1.11, 1.19, 1.03, },
    },
    ...
  }
end
For each of the industries, the following properties exist:
angleis the rotation angle of the construction.fileNameis the reference to the industry construction file.onWateris a boolean flag to set if the position is expected to be on water.positionis a pair of x and y coordinates.tagis a string used in the economies to flag certain industry positions for weighting.
For each of the towns, the following properties exist:
landUse2CargoNeedsCategoriesmaps the land usesres,comandindto cargo demands.nameis the name for the town.positionis a pair of x and y coordinates.sizeFactorsis a vector of size factors for the three districts of the town.
Main Street Connections Generation


When starting a new game, the towns are initially connected by a network of roads to allow individual car traffic to move from town to town. To generate this network in the map editor, select the button in the toolbar to open the menu.
This generator tool allows fully automated generation as well as manual adjustments. At the left side 1, you can either:
- Auto-detect Connections that already exist on the map
- Propose Default Connections to connect all towns together
- Clear Proposal to reset the proposed connections.
If you like to preserve existing streets between towns, enable Keep Connections below the buttons.
In the preview 2, the planned main street connection graph is symbolized by grey dots for the towns and thick gray bars between them for connections. It is possible to add new connections by clicking on a start and an end town dot:

To remove a connection from the graph, simply click on it:

Select the Generate button at the bottom 3, to transfer the graph into an actual street network. Due to difficult terrain, not all connections may actually be realized. If industries already exist on the map, they are connected too.
All generation tools may take a while to process the large amounts of data, especially when using large map sizes. During this time, the game may have limited response and you may not see the result immediately. After the generation the map will be visible bit by bit. Any errors on the edges of parts of the map are usually displayed correctly after a short time.
Road Construction

The full description of the road construction menu can be found in the infrastructure section. Keep in mind that station and depot construction for streets is disabled in the map editor.
Town Placement

 Beside the automated town distribution described above, it is possible to place towns manually with this tool.
You can adjust the initial capacity of the city with the slider. It correlates to the size of the city. Further you can select an initial accepted cargo for both the commercial and the industrial district of the town.
 +
 , you
By clicking at a location on the map, the town is generated there. A small progress indicator in the top right corner gives feedback on how far the generation proceeded.
If you like to alter the cargo demand of a town at a later point, select the town name and switch to the Editor tab. There you can reconfigure the cargo demands. To change the name of the town, click on the  button and edit the name.
To delete a town, select the  tool and click on the town name. After a confirmation, the town is removed and the terrain is reconstructed as good as possible.
 , hover a town name and press
Transport Fever 3 does not limit the size or number of towns, but be aware that maps with more towns, more streets and more vehicles lead to much more pathfinding calculations. If you place towns close to each other, you increase the number of reachable destinations for every inhabitant and you need stronger hardware to handle the late game.
Industry Placement

 Like towns, industries can be placed manually as well by selecting the industry tool in the toolbar. Then select the industry you like to build in the list of industries at the bottom.
You can turn off the input need for industries that are consuming and producing cargo like saw mills. Raw material industries additionally allow to configure the impact of the successful boosting of the industry by cargo delivery and the initial size of the industry which correlates to the number of fields around the industry.
By clicking at a location on the map, the industry is generated there.
To delete an industry, select the tool and click on the industry. After a confirmation, the industry is removed and the terrain is reconstructed as good as possible.
Terrain Tool

The terrain tool works as in the free game. See the terrain and decorations section for detailed information about its functionality.
Playing and Sharing a Map
When you like to finish editing the map, press the menu button in the bottom right corner to open the pause menu. There you can select Save Map to save the map.
To play a stored map, go to the main menu, select Load Game and click on a map in the grid at the bottom. See there for a detailed explanations of the available options.
 To share a map via the Mod Hub, go to Map Editor and open the details of the map card in the grid at the bottom by clicking the icon on the selected card. Then use the Share button in the bottom right.
The share dialogue offers multiple input fields 1:
- Save Game Name is the title of the entry in the Mod Hub that is also visible in the grid view. This name should not be longer than 32 characters and may not contain line breaks.
- Description is the descriptive text shown in the detail view of an entry in the Mod Hub.
- Summary is the summary of the map that is shown as a tooltip when hovering over a mod in the Mod Hub. It may not be longer than 100 characters and may not contain line breaks.
- Change Log is a quick summary of the changes that were done since the last update. It can be left empty.
- Make Public 2 can be used to set the map to visible for everybody. Otherwise it is not visible to the other players.
Be sure you are willing to accept the mod.io terms of service. If you want to read them (again), use the View button 3. To start the upload, select the Upload button 4. This may take a while. If the map is uploaded for the first time, it will create a new item in the Mod Hub, if it is updated, the old item will be replaced.
After a successful upload, the detail page of the mod.io item will be opened in the web browser. There you can add additional images, descriptions, contributors and more information. See the mod.io section in the modding manual for further details on this topic.
The uploaded map mod is stored in the staging area. It also contains a reference to the mod.io item which is stored in a mod.io_fileid.txt-file.