Table of Contents
Vehicle Advanced Topics
This page contains different topics that are mostly related to vehicles but may be relevant for other types of resources too.
Transformator Scripts
Transformators contain the logic that is used to compute events for animation and particles. They are defined in .trf.lua files and contain up to four function script references:
function data()

return {
  updateScript = {
    fileName = "transformator_train.script@train.updateFn",
    params = {}
  },
  updateParticleSystemScript = {
    fileName = "transformator_train.script@train.updateParticleSystemFn",
    params = {
      ["key1"] = "value",
      ["key2"] = "value"
    }
  },
  getEmittableModelsScript = {
    fileName = "transformator_train.script@train.getEmittableModelsFn",
    params = {}
  },
  computeEmittedModelsScript = {
    fileName = "transformator_train.script@train.computeEmittedModelsFn",
    params = {}
  },
}

end
It is possible to provide parameters from the .trf.lua file to the function scripts by attaching them as a key-value list in the params as seen in the example above.
To minimize the performance impact of transformator scripts, there is no access to api functions other than api.type in the following functions!
updateScriptFn
The updateScriptFn is called to transform and animate individual models.
local updateFn = function(
  captureParams : NativeLuaTable,
  transformatorParams : TransformatorParams,
  transfsOutput : TransfOutput
)
  if params.currentInfo.landVehicle ~= nil then
    local time = transformator_util.getEntityTime(
      params.currentInfo.world.gameTime,
      params.entityId
    )

    transformator_util.addAnimationStatesRailVehicles(
      params.currentInfo.landVehicle.side,
      params.currentInfo.landVehicle.reversed,
      transfsOutput
    )
    ...
    transformator_util.scaleUserTransfIndicesLoadConfig(
      params.currentInfo.vehicle.indicesLoadConfig,
      transfsOutput
    )

    local timeNose = math.ceil(state2fraction[params.currentInfo.aircraft.flightState] * 11000)
    transfsOutput:addAnimationState("nose_up", -1, timeNose, false, false)

    if params.previousInfo ~= nil and params.previousInfo.aircraft ~= nil then
      if params.previousInfo.aircraft.flightState ~= params.currentInfo.aircraft.flightState then
        local timeNosePrev =  math.ceil(state2fraction[params.previousInfo.aircraft.flightState] * 11000)
        transfsOutput:triggerAnimation("nose_up", timeNosePrev, timeNose) -- NOTE overrides animation state
      end
    end
  end
end
It receives three parameters:
captureParams: The params provided in the.trf.luafile.transformatorParams: A struct with global data as well as info about the individual models and its context to be used to adjust the particles. See below.transfsOutput: The result object that contains the transformation and animation state data that shall be rendered.
Most of the vehicle animation logic is provided by the transformatorutil.tl. It contains many different helper functions that are combined to form the default transformators. Some of the helpers rely on computation done by the simulation, e.g. the calculation of door animations due to performance reasons. In general, less complex transformators result in better performance.
To manipulate the models the same functions as inside the helper functions of the util can be used. The transfsOutput contains the following:
getUserTransfreturns a list of user transformations, these refer to the location and rotation of the model parts due to movement on rails etc.setUserTransfis the corresponding set function. It can be used to assign a custom transformation matrix to a node of the model by specifying its numeric index, the transformation matrix and a boolean property to specify if the transformation is absolute or relative. Default is relative.getAnimationStatesreturns a list of animation states that are registered.addAnimationStateallows jumping to a specific playback state of an animation. It receives an event name as string, start time as number, param as number and two booleans to set looping and reversed playback.triggerAnimationallows triggering the playback of an animation by providing the event name as string and optional start and end times.
All the functions and details about their parameters can be found in the Scripting API.
updateParticleSystemFn
The updateParticleSystemFn is called for every seperate particleSystem:
transformator_util.updateParticleSystemFn = function(
  captureParams : NativeLuaTable,
  transformatorParams : TransformatorParams,
  particleSystem : ParticleSystem
)
  if transformatorParams.currentInfo.vehicle ~= nil then
    ...
    local lifeTimeScale = ...

    for i = 0, particleSystem:getSize() - 1 do
      particleSystem:setLifeTimeScale(i, lifeTimeScale)
      ...
    end
  end
end
It receives three parameters:
captureParams: The params provided in the.trf.luafile.transformatorParams: A struct with global data as well as info about the individual models and its context to be used to adjust the particles. See below.particleSystem: The particleSystem that contains info about the individual emitters and is used to modify them.
It is recommended to do the following in order:
- check for the presence of certain state data in
transformatorParams - precalculate values
- iterate over all emitters of the
particleSystemto adjust them
The particleSystem provides two utility functions to use when iterating over the emitters.
- To get the number of emitters,
particleSystem:getSize()can be used. - The
particleSystem:getParticleId(emitterIndex integer)function can return the definedparticleIdstring of the emitter, e.g."cylinder". To apply certain effects only on some of the particles, this string can be compared to conditions.
All the set functions to manipulate the emitters like particleSystem:setLifeTimeScale(emitterIndex, lifeTimeScale) can be found in the Scripting API.
getEmittableModelsFn
The getEmittableModelsFn is required for the use of the computeEmittedModelsFn. It returns a list of models that shall be available to be emitted in the later function:
local getEmittableModelsFn = function(
  capturedParams : NativeLuaTable,
  transformatorParams : TransformatorParams
) : {string}
  local ret : {string} = {}

  ...

  return ret
end
It receives two parameters:
captureParams: The params provided in the.trf.luafile.transformatorParams: A struct with global data as well as info about the individual models and its context to be used to decide which models shall be used. See below.
It is recommended to provide data in the transformatorConfig.params of the models to this function.
computeEmittedModelsFn
The computeEmittedModelsFn may spawn models relative to the model for which this transformator is executed. This might be used to achieve similar results as the seats and cargo slots in the vehicle models, but for custom solutions:
local computeEmittedModelsFn = function(
  captureParams : NativeLuaTable,
  transformatorParams : TransformatorParams,
  modelEmitter : ModelEmitter
)
  ...
  modelEmitter:emitModel(modelId, api.type.Mat4f.new(), {}, locator, false)
  ...
end
It receives three parameters:
captureParams: The params provided in the.trf.luafile.transformatorParams: A struct with global data as well as info about the individual models and its context to be used to emit the models. See below.modelEmitter: The emitter object that is used to control the model emission.
It is recommended to do the following in order:
- check for the presence of certain state data in
transformatorParams - precalculate values
- iterate over all emitters of the
particleSystemto adjust them
The modelEmitter provides three utility functions to use when emitting models.
- To get the required modelId in the model repository without access to the
api.resfunctions, usemodelEmitter:getModelId(modelRes string). Be aware that the path to the model requires the explicit specification of a mod id like"wiki_example_transformator::/asset/random_number_1.mdl", otherwise it is assumed that it is in the base game. - The
modelEmitter:emitModel(modelId integer, transf Mat4f, animationStates {AnimationState}, parentNode string, alignToTerrain boolean)function can spawn a model with specified transformation and animation states relative to the parent node of the model, for which the transformator is executed. - The
modelEmitter:emitModels(modelIds {integer}, transf Mat4f, animationStates {AnimationState}, parentNode string, alignToTerrain boolean)function can spawn multiple models in a similar fashion.
It is only possible to emit models which are previously returned as result of the getEmittableModelsFn.
All details about the functions can be found in the Scripting API.
transformatorParams
The transformatorParams both for animations and particles contains static and dynamic data which can be used to adjust animations and particles. All details about the available data can be found in the Scripting API.
It always contains the entityId of the object as an integer. The other content depends on the context and may not always be present, hence it is important to check if it exists before using the content.
There is some static data available for different types of models:
modelMetadataInfomay contain info about defined seats.vehicleStaticInfois available for vehicles and contains info about the configured axles and time of purchase.aircraftStaticInfois only available for planes and helicopters.transformatorConfigParamscontains the data provided in thetransformatorConfig, e.g. in the vehicle.mdl.
Based on the result of the simulation, there is also dynamic info available, both of the current simulation step and the previous one in case the model was existing and in view before. The currentInfo and previousInfo both contain global info like time and weather as well as local info about the state of the model itself, if available:
worldprovides the current cloud coverage, game time in ticks since map start, date and ingame time as well as the real time.vehiclecontains the basic info about simulated vehicles like speed, power output, acceleration, maintenance level and info about the configuration of the whole consist.- Vehicle and carrier type specific info is provided in
roadVehicle,railVehicle,tram,landVehicle,aircraft,shipandairWaterVehicle. - Static models may have info in
industry,stationandtownBuilding.
Vehicle Transformator
This example has a custom transformator that showcases some of the possibilities of the transformator interface. It is available for download.
Explanation
The emd_f_random.mdl references a custom emd_f.trf in its transformatorConfig property. Some additional parameters are provided there as well to be used as captureParams in the transformator:
...
transformatorConfig = {
  skipFromLod = 2,
  transformator = {
    name = "emd_f.trf",
  },
  params = {
    randomGroups = {
      {
        locators = {
          "trf_number_left_1",
          "trf_number_right_1"
        },
        models = {
          "wiki_example_transformator::/assets/random_numbers/0.mdl",
          "wiki_example_transformator::/assets/random_numbers/1.mdl",
          ...
        }
      },
      ...
    }
  }
},
...
The randomGroups parameters are used to emit custom number plates. It contains a list of nodes that are used as position markers and models that are used to display the numbers. In the emd_f_trf.script.tl the getEmittableModelsFn() collects the models entries from all these random groups:
local getEmittableModelsFn = function(
  __captureParams : NativeLuaTable,
  transformatorParams : TransformatorParams
) : {string}
  local ret : {string} = {}

  local randomGroups : {RandomGroup} = (transformatorParams.transformatorConfigParams as ModelParamsRandomGroup).randomGroups
  if randomGroups ~= nil then
    for __, randomGroup in ipairs(randomGroups) do
      for __, model in ipairs(randomGroup.models) do
        table.insert(ret, model)
      end
    end
  end

  return ret
end
The computeEmittedModelsFn then goes through all the random group definitions and selects a random model of the models list, using the vehicle entity id and the index of the random group as seed. The id of the model is then retrieved by using the modelEmitter::getModelId function and then emitted once for each locator:
local computeEmittedModelsFn = function(
  __captureParams : NativeLuaTable,
  transformatorParams : TransformatorParams,
  modelEmitter : ModelEmitter
)
  local randomGroups : {RandomGroup} = (transformatorParams.transformatorConfigParams as ModelParamsRandomGroup).randomGroups
  if randomGroups ~= nil then
    for index, randomGroup in ipairs(randomGroups) do
      if #randomGroup.models > 0 then
        math.randomseed(transformatorParams.entityId + index)
        local model : string = randomGroup.models[math.random(1, #randomGroup.models)]
        local modelId : integer = modelEmitter:getModelId(model)

        if modelId ~= nil then
          for __, locator in ipairs(randomGroup.locators) do
            modelEmitter:emitModel(modelId, api.type.Mat4f.new(), {}, locator, false)
          end
        end
      end
    end
  end
end
The updateParticleSystemFn contains two different examples that only apply to some of the particle emitters. This is possible by using the particleSystem:getParticleId(index) function to get the individual particle ids which are then compared to a string in the transformator script:
local updateParticleSystemFn = function(
  __captureParams : NativeLuaTable,
  transformatorParams : TransformatorParams,
  particleSystem : ParticleSystem
)
  if transformatorParams.currentInfo.vehicle ~= nil then
    local velocity = transformatorParams.currentInfo.vehicle.direction * transformatorParams.currentInfo.vehicle.speed
    local maintenance = transformatorParams.currentInfo.vehicle.maintenance

    local ef = transformatorParams.currentInfo.vehicle.powerOutput / transformatorParams.currentInfo.vehicle.power

    local colorOffset = api.type.Vec3f.new(-0.1, -0.1, 0.05) * maintenance
    local sizeScale0 = math.max(ef, .25)
    local sizeScale1 = sizeScale0 + maintenance * 4
    local frequencyScale = 1.0 + 1.5 * maintenance * 4
    local lifeTimeScale = math.max(ef, .25) + 0.75 * maintenance
    local brakeSizeScale = transformatorParams.currentInfo.vehicle.brakeDecel
    for i = 0, particleSystem:getSize() - 1 do
      if particleSystem:getParticleId(i) == "exhaust" then
        particleSystem:setColorOffset(i, colorOffset)
        particleSystem:setSizeScale01(i, sizeScale0, sizeScale1)
        particleSystem:setFrequencyScale(i, frequencyScale)
        particleSystem:setLifeTimeScale(i, lifeTimeScale)
      end
      if particleSystem:getParticleId(i) == "brake" then
        if transformatorParams.currentInfo.vehicle.speed > 0 then
          particleSystem:setSizeScale01(i, brakeSiceScale, brakeSiceScale)
        else
          particleSystem:setLifeTimeScale(i, 0)
        end
      end
      particleSystem:setVelocity(i, velocity)
    end
  end
end
All particles with id "exhaust" are manipulated based on the maintenance level of the vehicle. The maintenance level is used as multiplicator for different properties like color, size, frequency and lifetime.
The particles with id "brake" are not affected by maintenance, but are deactivated when the vehicle is not braking.
Reversible Trains / Trams
Rail and tram vehicles can be configured to not flip when turning around in a station, but instead to reverse direction. The driver position can be configured accordingly and parts of the model can be shown or hidden depending on the direction and position in the train.
In order for a vehicle to be able to reverse direction, the first, the last vehicle as well as every motorized vehicle in the consist needs the reversible parameter set to true.
transportVehicle = {
  -- other configurations
  reversible = true,
}
Showing/Hiding Meshes
The visibility of meshes can be controlled depending on the travel direction by either using a custom transformator or using the default transformator with the predefined events as below:
...
{
  animations = {
    front_forward_parts_off = {
      params = {
        id = "::/vehicle/shared/ani/front_forward_parts_off.ani",
      },
      type = "FILE_REF",
    },
    front_forward_parts_on = {
      params = {
        id = "::/vehicle/shared/ani/front_forward_parts_on.ani",
      },
      type = "FILE_REF",
    },
  },
  materials = { "::/vehicle/train/emissive/train_all_lights.mtl", },
  mesh = "::msh/headlights_fwd_lod0.msh",
  name = "headlights_fwd",
  transf = { 1, 0, 0, 0, 0, 1, 0, 0, 0, 0, 1, 0, 0, 0, 0, 1, },
},
...

Each position requires both the on and off animation event to be present:
1 front_forward_parts_on/front_forward_parts_off is shown at the front of the whole train consist and driving forward
2 inner_forward_parts_on/inner_forward_parts_off is shown when not at the front or back of the train consist and driving forward
3 back_forward_parts_on/back_forward_parts_off is shown at the back of the whole train consist and driving forward
4 front_backward_parts_on/front_backward_parts_off is shown at the front of the whole train consist and driving backward (only if consist is reversible)
5 inner_backward_parts_on/inner_backward_parts_off is shown when not at the front or back of the train consist and driving backward (only if consist is reversible)
6 back_backward_parts_on/back_backward_parts_off is shown at the back of the whole train consist and driving backward (only if consist is reversible)
Be aware that an instance of a mesh can't be used for multiple of these purposes. To use the same mesh in several cases, add another instance of it.
To show or hide meshes only depending on the direction, not the position, there are additional animations:
forward_parts_on/forward_parts_offis shown when driving forwardbackward_parts_on/backward_parts_offis shown when driving backward
To show or hide meshes only depending on the position, not the direction, there are animations available too:
has_previous_on/has_previous_offis shown when there is a vehicle in front of the current vehiclehas_no_previous_on/has_no_previous_offis shown when there is no vehicle in front of the current vehiclehas_next_on/has_next_offis shown when there is a vehicle behind the current vehiclehas_no_next_on/has_no_next_offis shown when there is no vehicle behind the current vehicle
It is possible to use these configurations for many purposes like end of train devices, switching pantographs depending on the location in train and interconnecting gangways between coaches.
Seat Provider
It is possible to restrict crew seats to only be used in forward or backward direction by using the forward property.
seatProvider = {
  drivingLicense = "RAIL",
  crewModels = {},
  seats = {
    {
      animation = "driving_upright",
      crew = true,
      forward = true,
      group = "body",
      transf = { 1, 0, 0, 0, 0, 1, 0, 0, 0, 0, 1, 0, 8.5, 0.15, 1.35, 1, },
    },
    {
      animation = "driving_upright",
      crew = true,
      forward = false,
      group = "body",
      transf = { 1, 0, 0, 0, 0, 1, 0, 0, 0, 0, 1, 0, -8.5, 0.15, 1.35, 1, },
    },
    ...
  },
To display some seats only when the vehicle is at the front of the train, use one of the meshes that are shown/hidden as the group, e.g. "headlights_fwd" in the example above.
Buy Menu Groups
Transport Fever 3 allows grouping of vehicles with similar properties in the vehicle store. This is especially useful for shape variants, repaints and multiple units with different length configurations. In the game such a grouping is indicated by the reference to n variants in the title of the group entry. In the right column you will then find another list with the variants contained in these groups in the lower area. The technical data shows the values of the currently selected variant in the group.
For vehicles with a long development time, it is not necessary for the group model to cover the availability range of all variants. If only one variant is available at a time, it is displayed individually in the purchase list. As soon as two or more variants are available, the group entry with the variant list is displayed.
Grouping is not only possible for rail vehicles. It can also be used for other vehicle types (aircraft, ships, road and tram vehicles).
For rail vehicles, there is also the special case that different variants of a group have different engine types defined, e.g. diesel and electric. If in the vehicle store the filter is set to "ALL", all are displayed under the group. If e.g. diesel vehicles have been explicitly selected, only the corresponding subset of the vehicles is displayed.
Model Files

Groups for the buy menu are passively defined in Transport Fever 3 by optionally setting a parent in the groupFileName property of the transportVehicle metadata. The path is relative to the child model file. Only then will a vehicle store entry be displayed as a group:
transportVehicle = {
  carrier = "RAIL",
  compartmentsList = {
    ...
  },
  multipleUnitOnly = false,
  groupFileName = "menu_1020.mdl",
},
Multiple Unit Files
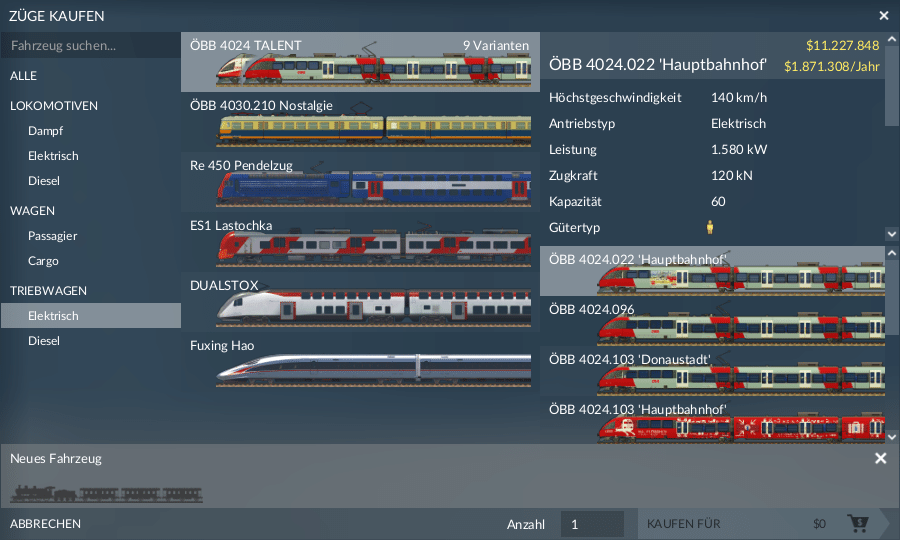
In the case of multiple-unit trains, the representation looks exactly the same as for individual vehicles. A multiple unit may define a groupFileName as well. The path is relative to the .mu.lua file. An example looks like this:
function data()
return {
  vehicles = {
    ...
  },
  groupFileName = "menu_cityjet.mdl",
  name = _("oebb_4744_name"),
  desc = _("oebb_4746_desc")
}
end
Individual Group Icons and Names
Especially for vehicles with many colour variations one would like to show in the group entry what one can expect in the group. Therefore it is necessary to create an individual menu model as a placeholder, which is never displayed in the game itself as a variant to buy. This model gets the name of the desired group and the preview image is saved as ui image for this menu vehicle. In the code it is important that the multipleUnitOnly entry is set to true. As long as no multiple unit contains the model, this means that the entry itself is never offered for sale, but only appears if a subordinate train or model is available. It is important that the groupFileName is not set for this model:
transportVehicle = {
  carrier = "RAIL",
  compartmentsList = {
    ...
  },
  loadSpeed = 1,
  multipleUnitOnly = true,
  reversible = false,
  -- groupFileName not set!
},

The examples shown above each use an individualized menu item according to this scheme. To support a common style, it's recommended to use one of the two common styles for the menu icon.
The first style places the icons all on the same level. To create the image do the following steps:
- Take up to 4 of the available variants
- Place them 30 pixels apart of each other with the right one being at the front
- Make an approximately 2 pixel wide gap between the variants to improve the contrast
- For multiple units, use 50 - 100 % of the second coach, too
- In the normal size of the purchase menu, the images can be a maximum of 327 pixels wide. Then the menu is stretched accordingly. Starting from 700 pixels the right edge is cut off.
Another common style uses diagonally offset images.
Fake Bogies

vehicle parts with pivot points at normal bogies
Transport Fever 3 uses the axle configs to determine which part of the vehicle needs to be aligned along the tracks or street lane:
- The origin of an axle always sits centered above the the lane.
- Nodes that contain axle meshes as children are considered as bogies. Bogies have a pivot point at their mesh origin, which should sit in the center between the axles.
- Nodes that contain two bogies have their pivot point in the center between the bogie pivot points.
- Nodes that contain more than two axles or bogies use the outer most to align.
The picture shows the Be 4/6 tram that has three articulated parts. The middle frame sits on two axles and is considered as a bogie on its own. The front and back parts have one bogie seperated from the main frame. As they each do not have a second bogie, the articulation would not look good in turns. That is why there might be the need to imitate a bogie, especially on articulated vehicles or road vehicles with steering wheels.
These so called fake bogies are manually scripted pivot points that are attached to a node as replacement for non existant real bogies. They are listed per LOD in a fakeBogies list struct in the vehicle config struct:
...
config = {
  {
    axles = { "w1", ... },
    fakeBogies = {
      {
        group = "front_body",
        offset = 2.0299999713898,
        position = 0,
        upright = false,
      },
      {
        group = "rear_body",
        offset = -2.0299999713898,
        position = 0,
        upright = false,
      },
    },
  },
  ...
},


vehicle parts with additional fake bogies
Each fakeBogie has four properties:
groupis the name of the node to which the fake bogie should be attached. In the picture, this would be the one larger grey end body mesh 1.positionis the position along the lane from the root node of the model. Positive values go to the front of the vehicle, negative values to the end. In the picture, the blue point on the right is positioned where thepositionproperty points 2. At this point, a tangent to the lane is calculated. This is visualized by the blue line.offsetis the offset from the place wherepositionpoints to the actual point on this tangent that is used as the pivot point. In the picture, this is the red point 3.uprightis an optional parameter that can be set to true for models that should always stand or hang upright.
It is possible to define up to two fakeBogies per node. If the number of real bogies and fakeBogies exceeds two, the regular bogies are overridden. In the example there is a regular bogie 4 beside the fakeBogie explained above. The node will then align along the connection of the two pivot points 5.
The Be 4/6 tram with its three articulated parts received two fake bogies both positioned in the center and with an offset from there.
Road vehicles usually have their fake bogies either between the two axles or in case of articulated busses on the back axle of the front part but with an offset to the hinge between front and back part.