Table of Contents
This page is not yet adapted for Transport Fever 3. The content may be outdated.
Ingame Tools
There are several tools available ingame to test and debug content. To activate these features, the debug mode has to be enabled. To do this, change the according debugMode value in the settings.lua to true or toggle the option in the game settings advanced options.
Once enabled, you have:
- enabled debugging hotkeys to help debugging or testing modifications
- additional debug views and windows
- unlocked access to all campaigns and missions
- several filetypes are automatically refreshed when they changed (this e.g. covers updateFn definitions)
Hotkeys
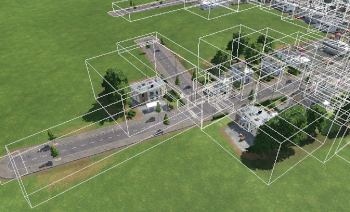

The following hotkeys are available with activated debug mode:
(In the US keyboard layout, the AltGr key is the right Alt)
| Hotkey | Function |
|---|---|
| AltGr + A | Reload sound sets |
| AltGr + B | Show bounding boxes |
| AltGr + D | Open Debug Tool Window (see below) |
| AltGr + E | Show chunk refresh |
| AltGr + G | Hide user interface |
| AltGr + I | Show GPU workload statistics and simulation diagrams |
| AltGr + L | Show lanes |
| AltGr + R | Recompile shaders (keep existing when compilation fails) |
| AltGr + Z | Open camera tool |
In general, most of these modes can be switched on and off by repeating the keyboard combination.
Debug Tool Window
The debug tool window has several tabs with different functions that are described below. It can be opened with AltGr + D.
Main
The MAIN tab has several options regarding rendering and miscellaneous other tools.
In the General section, the current cursor position is shown with all three coordinates.
The Rendering options cover several modes that are available as Hotkeys as well as some others:
- Show Bounding Boxes is the same as AltGr + B
- Freeze Render is the same as AltGr + F
- Show Lanes is the same as AltGr + L
- Grass Prepass is a rendering technique used to fasten the grass rendering. It is enabled by default.
- Terrain Prepass is a rendering technique used to fasten the terrain rendering. It is enabled by default.
- Terrain Disable Filter disables the dithering between different textures. The dominationg materials are displayed alone in a grid of 1×1 m².
- LOD Scale is a slider to simulate different LOD distances.
- Terrain Memory Usage is a slider to adjust the ratio between performance and memory consumption of terrain data.
- Terrain LOD error multiplier is a parameter for the terrain LOD generation tolerance.
- Terrain LOD radius multiplier is a parameter for the terrain LOD generation radius. The average in this radius is used for the simpler LOD geometry.
The Simulation options provide buttons to increase the simulation speed up to 32 compared to the regular maximum of 4.
Finally the UI Debug tools have two tools:
- With Show UI Element (Console) it is possible to get the type and identifier of the current ui element the cursor is pointing on. The output can be read in the console.
- Toggle Ruler enables or disables a small ruler tool that can be used to measure distances on the map.
Framebuffers
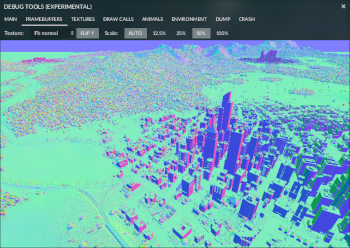
Some rendering intermediate frames can be reached in the FRAMEBUFFERS tab. These are:
- Fb color with color information.
- Fb normalmap with the overall normal information.
- Fb depth with depth information. As the depth information is stored exponential, zoom in to see some differences.
- Hdr lum with light emission and reflecion information.
- Hdr blur final and Hdr small with light blurring information.
- Shadow map is some depth information but from the origin of the sunlight.
- Ssao with ssao information.
- Ssao final with the blurred ssao information.
- Reflection with reflection information.
The views depend on the current main viewport and can be scaled to various sizes.
Textures
To get an overview over the currently loaded textures, the TEXTURES tab can be used. It shows a complete folder tree with all loaded textures or only the subset with file sizes larger than the Threshold that can be set in the text box at the bottom edge.
Draw Calls
The DRAW CALLS tab lists all current draw calls proceeded by the engine. There are several different properties listed in the top section:
- Draw calls is the total number of current draw calls.
- Tec binds is the number of different material techniques / shaders used for the objects.
- Mat binds is the number of loaded materials.
- Total instances is the number of all objects rendered.
- Total vertices is the total number of vertices of all these objects.
Below is a sortable table with different columns:
- # is an ID in the order of rendering.
- Type is
eitheropaque for non transparent materials ortranspfor transparent materials. - Material is the reference to the used material.
- Mesh is the name of the displayed mesh.
- Grp is the number of the submesh of this mesh.
- Inst is the number of instances of this mesh.
- Mode is usually
trisfor triangle based objects.pointsare very rare. - Vert is the number of vertices of one instance.
- Inst*Vert is the product of the vertices and the number of instances.
- % is the percentage of the total workload.
Animals
There is a dropdown where the score maps for animals can be selected. They are visualized with red and blue colors. The current animal movements and distribution can be shown with the two buttons at Debug rendering below.
Environment
The settings of environments can be tested live in the ENVIRONMENT tab. It provides several input fields to test the different properties. See the documentation of environments for more information on their meaning.
At the bottom is a Load From Camera Tool and a Save to Camera Tool button. These can be used to temporarily store an environment setting for the use in the camera tool.
Dump
A list of component types of an entity can be gathered from the Entity information dump. By entering an entity id, confirming it with REFRESH and pressing GOTO, it is possible to jump to the entity on the map.
Crash
The last tab CRASH provides several buttons that can be used to force a crash of the game. Usually this is not needed for modders, but if you like you can test various ways of forced crashes there.
Console

The ingame console can be used to see the output that is written in the stdout.txt as well as to test and execute lua commands. The console can be opened and closed by default with the key below the ESC key. Depending on your keyboard layout it could be either `, § or ^.
You can execute lua commands in the command line by typing them and pressing ENTER. To enter complex statements with several lines of code, simply press ENTER inbetween. The console will execute the commands once syntactically complete, even if they span over many lines.
There are some assisting commands available:
\helpshows this list of available shortcuts and assisting commands.\clearclears the console.\stdout <on|off>regulates the output instdout.txt. Default ison. If set tooffthere will be no output in thestdout.txt.\timestamp <on|off>shows timestamp in front of output if set toon. Default isoff.\scrlk <on|off>does not jump to the bottom if new output appears if set toon. Default isoff.\historyprints a history of recent sent commands.
You may use the Up and Down keys to recall and cycle through the recent sent commands from the history.
To see a list of available functions, press CTRL + SPACE. This opens the autocomplete menu. You may use the Up and Down keys or the scroll wheel to navigate in the autocomplete menu. Press ENTER or click on a command to add the selected command to the console command line.
If you press TAB in the command line, the command will be completed if it can be completed unambiguously. Pressing TAB twice prints the available commands from the current autocomplete menu view to the console.
Construction Development Tools
To ease the creation of constructions, there are several assistance tools available.
Set Dressing Assets & Ground Textures
To decorate constructions, it is recommended to use the available asset models of the base game. The Asset Placer mod provides most of them in the landscaping menu. As they have the allowSnapToMesh flag set to true in the snapPoint struct, it is possible to snap them directly to a surface of a model, e.g. to a building wall after pressing Alt.
To move around some assets after placing them, the Toggle asset manipulator in the Main tab of the debug tools window can be used. Click on a model after activating it and it will be highlighted in turqoise. The shown axis handles can be used to move it around in 3D space. The menu on the left side of the screen allows manually tuning positions, size and rotation as well as to delete and clone the model.
The terrain can be painted with the brushes in the landscaping menu as well. To define areas that shall not be painted by the construction but what is already there, use a terrain material that has a file name containing "chroma_key". A mod containing such a material is provided below.
After decorating and painting the terrain, both can be exported. For that to work, the construction needs to have a configured ground texture. Go to the Dump tab of the debug tools window and click on the construction. On the right side, the Print button allows to update the referenced .gtex.lua and its referenced index texture of the construction. Additionally, a <construction_name>_assets.tl file containing a list of all model instances is generated. Its content can be copied over elsewhere or the file can be required by a .script.lua. The constructionutil.addModels function can insert such a list to a subconstruction model result.
Chroma Key Mod
This mod contains a pink terrain material that will be skipped when exporting the ground texture mask as described above. The mod can be downloaded here.