Table of Contents
Material Definition (.mtl)
Materials are stored in files with the .mtl file ending.
The format mainly consists of a list of properties. The material type (type) specifies the required set of properties (see below for a reference). order is used for sorting the materials for rendering, if two materials have the same type.
function data()
return {
  order = 0,          -- render order (used for same materials only)
  params = {          -- holds list of properties

  },
  type = "PHYSICAL"   -- material type
}
end
Parameters
There are three different types of parameters:
- Maps reference texture files.
- Operations specify overlay operations performed on those textures.
- Properties configure additional aspects, e.g. behavior of transparent surfaces.
For technical reasons, the actual parameters are encased in one of the three structs:
fragmentSamplersfor most of the maps.fragmentPropertiesfor most of the actual properties.vertexPropertiesfor very few properties.
It is recommended to use the Model Editor to edit materials as it takes over dealing with this structure.
Maps
Maps are used to describe the textures used by a material. The accepted file formats are the .dds(prefered) and .tga. See there for details on compression requirements.
map_albedo_opacity = {
  fragmentSamplers = {
    albedoOpacityTex = {
      type = "TWOD",                      -- texture type: TWOD, CUBE_MAP, TWOD_ARRAY
      fileName = "tex/bus_d40_albo.dds",

      magFilter = "LINEAR",               -- NEAREST, LINEAR
      minFilter = "LINEAR_MIPMAP_LINEAR", -- NEAREST, LINEAR, LINEAR_MIPMAP_LINEAR, LINEAR_MIPMAP_NEAREST, NEAREST_MIPMAP_NEAREST
      wrapS = "CLAMP_TO_EDGE",            -- REPEAT, CLAMP_TO_EDGE
      wrapT = "CLAMP_TO_EDGE",            -- REPEAT, CLAMP_TO_EDGE

      maxDegreeOfAnisotropy = -1,
      mipmapAlphaScale = 0,
      mipmapBaseLevel = 0,
      redGreen = false,
      scaleDownAllowed = true,
      textureLodOffset = 0,
    }
  }
}
The attributes are as following:
- There are three
types: two dimensional (TWOD), cube map (CUBE_MAP) and an array of two dimensional textures (TWOD_ARRAY). Most of the materials useTWOD. See here for more details about file referencing. - The
magFilterallows defining which interpolation should be used when zooming in the texture. Pixels either are interpolatedLINEARor on basis of theNEARESTneighbor. - The
minFiltersets the interpolation method that is used when zooming out. Pixels either are interpolatedLINEARor on basis of theNEARESTneighbor. When using the defaultLINEAR_MIPMAP_LINEAR, the mip maps of the texture are used (or generated if not present). - With
wrapSandwrapTit is possible to define if a material is tiled and repeating or if it is not repeating and the mapping should be clamped to the texture surface. - The
maxDegreeOfAnisotropydescribes how many samples of a textures are taken when looking at shallow angles (and the texture is distored). Higher values reduce the rendering performance, hence the default -1 is recommended. - The
mipmapAlphaScaledescribes the multiplication factor for the alpha channel of each mipmap, on generation of mipmaps for.tgafiles. It is usually used with cutout materials to make the blending at the edges softer. - The
mipmapBaseLevelallows forcing the use of a mipmap level instead of the full scale texture on purpose. This only works with dds files with mipmaps. - For normal maps in
.tgaformat, theredGreenflag specifies that they are actually normal maps with the two channels, instead of normal RGB channel textures. - The
scaleDownAllowedflag enables texture streaming, else the highest resolution is always used. - When texture streaming is active, the
textureLodOffsettells the engine to pick the mipmap with this offset applied (effectively telling the engine to load a lower/higher resolution image of what it should).
There are several types of maps existing. See the tables below for information about which map is used with which material type.
Color Maps
The most common map types are maps that store color information. There are some differences in the way the alpha channel is used:
| Map | Alpha Channel |
|---|---|
| map_color, map_albedo, map_emissive | no alpha channel |
| map_color_alpha | 0% or 100% transparency |
| map_albedo_opacity | 0% - 100% transparency |
| map_op_1, map_op_2, map_dirt, map_rust | 0% - 100% transparency |
| map_albedo_gloss | 0% - 100% glossiness |
Some of these maps have special purposes. map_emissive is exclusively used for the light emitting material EMISSIVE. The map_op_1 and map_op_2 are used for operations. See below for further explanation of operation modes. map_dirt and map_rust are used for the dirt and rust texture. The intensity in dependance of the vehicle is controlled by the map_cblend_dirt_rust below. map_albedo_gloss does not have transparency information but gloss information. This behaviour is known back from the Train Fever days. 0% in alpha channel means no gloss effect, 100% in alpha channel means total gloss effect.
Metal / Gloss / Ambient Occlusion
Since Transport Fever 1, the engine supports materials with properties capable of providing data for physically based rendering (PBR). The map_metal_gloss_ao stores most of the neccessary information:
- The red channel is the information for metallic reflection effect. 0% is non-metallic, 100% is full metallic intensity. Often, a value around 60-80% is used for metallic surfaces.
- The green channel stores the glossiness information. A glossy surface has a sharp reflection of light while a surface that is less glossy has more diffuse reflection. 0% means no gloss effect, 100% means maximum gloss effect. Usually, the gloss effect is higher for exposed edges so they pop out a bit.
- The blue channel contains the ambient occlusion data. Areas that are obstructed from ambient illumination get a basic shading with this property. 0% means maximum shading, 100% is no ambient shading.
Some materials support a seperate ambient occlusion map. It is referenced with map_ao
The metal and gloss effects can best be reproduced with your own tests. A sample model for better understanding is available for download here.
Color Blending / Dirt / Rust
Especially vehicle models often use materials that support color blending and aging effects. There are two map types with color blending information:
| Map | Red | Green | Blue | Alpha |
|---|---|---|---|---|
| map_cblend | color blending information | |||
| map_cblend_dirt_rust | color blending | dirt intensity | rust intensity | - |
The channels for color blending information are used in inverse scale. The darker the channel is, the more intensive is the recoloring effect once used. To ensure that the brightness of recolored areas suits other models, pick the actual brightness value of the texture color in the recolored area (0…1 in HSV Color Format) and write that in the albedoScales attribute of color_blend property (see below).
The map_cblend contains four different color blending maps, each in one of the channels. They are used in combination with the colorConfig structs in character models.
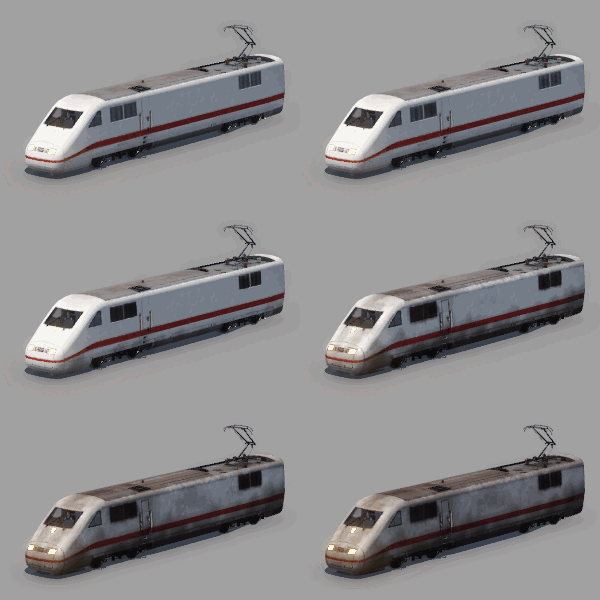
aging vehicle with dirt and rust
The dirt effect is an indicator for the age of vehicles. Depending on the age of the vehicle, the intensity of the dirt effect is inreased gradually. In order not to cover the whole vehicle uniformly with dirt, individual dirt areas and their relative intensity can be defined in this channel. Black means no dirt, white is full dirt. Preferred dirt areas are e.g. roof areas especially around pantographs, fan grilles, bogie parts and vehicle fronts.
The rust effect has the same purpose as the dirt effect. Depending on the age, the rusty areas get more intensity. Black means no rust, white is full rust. Usually rust occurs at non painted parts of vehicles, areas that are exposed to rain like window borders and in indentations, grooves and so on.
Usually the standard dirt and rust textures are used. With the map_dirt or map_rust and the according map_dirt_normal and map_rust_normal maps you can also provide your own textures and normal maps for dirt and rust. This makes it possible, for example, to simulate a fading of the vehicle paint. However, this requires a complete additional texture and is therefore not recommended for general use with regard to memory consumption.
Normalmaps

no normalmap / normalmap
The normalmap effect is used to offset surfaces while rendering to emulate sculpted details, which are only realized with textures and not with 3D models. These can be small elevations such as rivets, screw heads and buttons, but they can also be depressions such as slits, holes and other separating edges. Even actually flat surfaces can look much more realistic by using a normalmap with slight unevenness. This concerns e.g. uncleanness in the paint of old locomotives. But normalmaps can also be used to show surface textures such as the grain of wood. Modeling these details within the 3D model would mean an immense increase in model sizes and thus a significantly higher load with regard to model rendering.
Technically, for every pixel of the texture, the surface orientation is specified relative to the orientation of the actual model face. This is called tangent space. Each of the three color channels of the normalmap texture represents one of the x, y and z axis. The light blue to purple coloration of normalmaps is a typical indentification mark for tangent space normalmaps. It is common that they are generated with a tool out of a greyscale image or other texturing programs. See external tool reference for some hints regarding texturing tools.
To better understand the way normalmaps work, you can have a look at another sample model that is available for download here.
Light Maps
To support illuminated windows for buildings at night, Transport Fever 3 features new texture maps:
The map_id is used to assign mapped faces to id numbers. All faces with the same assigned color on this texture will switch on the lights at the same time. The texture needs to be an 8bit greyscale texture, e.g. a .dds with L8-Format. The greyscale values need to be one of the following: 0, 255 or 4 + 8 * x. It is recommended to use the following attributes for this map:
map_id = {
  fragmentSamplers = {
    idTex = {
      type = "TWOD",
      fileName = <filepath>,

      magFilter = "NEAREST",
      minFilter = "NEAREST_MIPMAP_NEAREST",
      wrapS = "CLAMP_TO_EDGE",
      wrapT = "CLAMP_TO_EDGE",

      scaleDownAllowed = false,
    }
  }
}
The map_lgt is a mask for the emissive intensity, e.g. to mimic curtains and other shadows behind the window. Only the red channel of the texture is considered as mask.
To get a better looking appearance of illuminated windows, it is recommended to at least have some gradient on the map_lgt for the windows, with slightly darker values at the top.
Operations

map_albedo, map_op_1*, 1:MULTIPLICATION, 2:OVERLAY, 3:LINEAR_BURN, 4:ALPHA_BLEND
* without transparency
Some material types can use multiple overlay operations (currently at most two) with textures. These overlay effects can be used, for example to overlay repetitive textures such as walls or floors with another irregular texture, thereby reducing the unnatural monotony.
For each operation, a map (map_op_1 / map_op_2) and a set of parameters (operation_1 / operation_2) have to be specified. These operate on the color values and adjust them. Apart from being disabled (NO_OP), there are four types of operations.
With MULTIPLICATION, the color values of each rgb channel are multiplied. As both values are between 0 and 1, it's likely that the result is darker.
red_result = red_map_albedo × red_map_op
The effect of OVERLAY operation depends on the brightness of the operation map. If the value is smaller than 0.5, the result equals MULTIPLICATION. If the value is larger than 0.5, the inverse method is used. It results in a brighter image.
red_result = 1 - ( 1 - red_map_albedo )×( 1 - red_map_op )
LINEAR_BURN adds the values of each rgb channel and then subtracts 1. The resulting image is likely to get darker.
red_result = red_map_albedo + red_map_op - 1
ALPHA_BLEND overlays the albedo map with the texture from map_op. Where the operation map texture is transparent, the albedo map texture is visible. A possible use case are the bottom areas of tree trunks which have some mossy overlay.
There are three modi of obtaining the texture coordinates for the overlay texture: use the local coordinates (NORMAL), the world coordinates (WORLD_XY) or the uv-coordinates (TEXCOORD). With OFFSET_TEXCOORD the texture coordinates are offsetted by a random value.
operation = {
  fragmentProperties = {
    {
      op = "OVERLAY",        -- NO_OP, MULTIPLICATION, OVERLAY, LINEAR_BURN, ALPHA_BLEND
      mode = "NORMAL",       -- TEXCOORD, WORLD_XY, NORMAL, OFFSET_TEXCOORD
      scale = { 0.05, 0.5 }, -- scale of overlay texture
      opacity = 0.5          -- opacity of operation
    }
  }
},
Properties
Light Receiver
The light_receiver property is used to define several rendering behaviors:
light_receiver = {
  fragmentProperties = {
    {
      lightMask = 2,
      isLegacyMaterial = false,
      disableShadowMapWrite = false,
      lightMaxDistanceScale = 1.0
    }
  }
}
The lightMask property is used so the material can be filtered to be enlightened or not by different light emitters. The following list shows the different values of the bitset:
- 0 = Nothing
- 1 = Terrain materials
- 2 = Exterior/Standard materials (Models, Labels, …)
- 4 = Water / Ship Foam / Waves
- 8 = Particles
- 16 = (reserved)
- 32 = Interior materials
- 64 = (reserved)
In practice, most model materials have value 2, only interior materials of vehicles have value 32. Character models usually have 34, as they may be used both outside and inside of vehicles. See the infos for the light source list for the other side of this filtering.
The isLegacyMaterial property is used for migrated textures from Transport Fever 2.
The PBR interpretation of textures in Transport Fever followed a slightly different standard. For Transport Fever 3, the normal appearance in the game is more similar to the look in Substance Painter. The isLegacyMaterial flag is only recommended to be used with old Transport Fever 2 textures. For new textures, the flag should always be set to false.
With disableShadowMapWrite, it is possible to prevent a material from casting shadows, this might be used by decal/overlay materials, e.g. the road markings.
The lightMaxDistanceScale is an optimization attribute that can be used to reduce the distance at which light sources can affect the material, saving some GPU load.
Albedo Scale
The albedo_scale property is used to scale the color intensity of the three color channels red, green and blue. For example it can be used to use one colored texture for multiple color variations by tweaking the albedoScale of different materials.
albedo_scale = {
  fragmentProperties = {
    {
      albedoScale = {
        1.0,                      -- scale value of red color channel
        1.0,                      -- scale value of green color channel
        1.0                       -- scale value of blue color channel
      }
    }
  }
}
Alpha Scale
This property is used to scale the transparency intensity of the alpha channel when using materials with transparency. See below for further tips on transparent materials.
alpha_scale = {
  fragmentProperties = {
    {
      alphaScale = 1.0            -- scale alpha value of transparent materials
    }
  }
}
Emissive Scale
This property is used to scale the light intensity of the three color channels red, green and blue when using materials of type EMISSIVE.
emissive_scale = {
  fragmentProperties = {
    {
      emissiveScale = {
        1.0,                      -- scale value of red emissive color channel
        1.0,                      -- scale value of green emissive color channel
        1.0                       -- scale value of blue emissive color channel
      },
      fromTime = -1,              -- -1 or within 0 - 24
      toTime = -1,                -- -1 or within 0 - 24
    }
  }
}
The fromTime and toTime properties specify the time range in which the texture should be emissive, otherwise it is invisible. With value -1, the lights automatically adapt to the surrounding brightness, impacted by time and weather.
Normal Scale
This property is used to scale the normal map intensity. Keep in mind, that the scaling factor of a mesh influences the normal map intensity as well.
normal_scale = {
  fragmentProperties = {
    {
      normalScale = 1.0
    }
  }
}
Alpha Test
This property is a combined property used for two different purposes when dealing with transparent materials.
alpha_test = {
  fragmentProperties = {
    {
      alphaThreshold = 0.5,                 -- range from 0.0 - 1.0
      a2CThreshold = 0,                     -- range from 0.0 - 1.0
      cutout = false,
      sorted = false,
      disableDepthAndNormalWrite = false,
    }
  }
}
alphaThreshold is used to discard pixels with lower alpha values when calculating shadow drop. Areas with opacity bigger than the threshold are considered as solid for shadow caluclation. It can be used to let light shine through glass faces. a2CThreshold works in a similar way but is used for the transparency of the mesh itself. Alpha values which are more transparent than the threshold are not rendered at all.
cutout can be used to switch the transparency mode. See below for further explanation and the disadvantage of the cutout technique.
To ensure correct sorting of transparent meshes, sorted can be set to true. These faces are rendered in an order based on the distance between camera and the origin of the mesh.
With disableDepthAndNormalWrite faces do not write depth and normal information. This results in them being ignored for SSAO calculation.
Color Blending
Some materials offer color blending. This is used with recolorable vehicles for example. Usually, the mask for color blending is a one channel grayscale mask (the red channel of cblend_dirt_rust map). Then the code struct looks like this:
color_blend = {
  fragmentProperties = {
    {
      albedoScales = { 0.07 },          -- scale gray value (which is overlayed with color)
      color = { 50/255, 85/255, 38/255} -- (default) color used for blending
    }
  }
}
The SKINNING_PHYS_NRML_MAP_CBLEND4 material uses a four channel (RGBA) color blending mask. Then, albedoScales contains 4 values, one for each channel.
color_blend = {
  fragmentProperties = {
    {
      albedoScales = { 1.1, 1.9, 1.8, 0.5 }, -- scale gray value (which is overlayed with color)
      colors = { }                           -- (default) colors used for blending
    }
  }
}
Dirt & Rust
Vehicle models often use materials with dirt and rust effect. They may either use individual sets of dirt and rust textures or they use the default ones from content/vehicle/shared/mat/tex/ directory. These can be adjusted with the dirt_rust properties. It is possible to set the color, opacity and the scale of the dirt and rust texture.
dirt_rust = {
  fragmentProperties = {
    {
      age = 0,                                -- range from 0.0 - 1.0

      dirtColor = { 62/255, 58/255, 51/255 }, -- range each from 0.0 - 1.0
      dirtOpacity = 5/100,                    -- range from 0.0 - 1.0
      dirtScale = 100/12.5,                   -- default 1.0, any positive number

      rustColor = { 89/255, 61/255, 38/255 }, -- range each from 0.0 - 1.0
      rustOpacity = 50/100,                   -- range from 0.0 - 1.0
      rustScale = 100/34.77                   -- default 1.0, any positive number
    }
  }
}
The age property is used to determine the dirt/rust level for models which do not receive age information from the game (e.g. static asset models).
Fading out
Usually models are invisible if the distance between them and the camera is greater than a certain value defined in the level of detail. In some cases it is desired that models do not get invisible instantly but fade out slowly when the distance gets large. This can be achieved by setting the fade_out_range property values to the range in which the material should fade out from full visibility to invisibility:
fade_out_range = {
  vertexProperties = {
    {
      fadeInEndDist = 0,
      fadeInStartDist = 0,
      fadeOutEndDist = 20000,
      fadeOutStartDist = 10000,
    }
  }
}
Polygon Offset
This property is used to manually offset render order in the z-buffer.
polygon_offset = {
  fragmentProperties = {
    {
      factor = 0.0,
      units = 0.0
      forceColorWrite = false,
      forceDepthWrite = false,
    }
  }
}
To add a rendering offset, set factor and units to the same negative value. Try to keep the factor and units value as near to 0 as possible to minimize negative side effects. See below for further information.
To force rendering of a material in the layers, e.g. for tram tracks, forceColorWrite can be set to true.
If you use a polygon_offset, set forceDepthWrite to true on the lowest offsetted material. If more than one offsetted materials, only the lowest needs the forceDepthWrite.
Two Sided
Usually materials are only visible from the frontside. This behaviour can be seen when looking from the inside of vanilla buildings outwards by using the camera tool.
two_sided = {
  fragmentProperties = {
    {
      twoSided = false,
      flipNormal = false
    }
  }
}
If a material should be used with front and backside visible, twoSided has to be set to true. Keep in mind that this doubles the amount of polygons which have to be rendered. Use it carefully.
If a material with normal map is used in twoSided mode, flipNormal should be set to true too. Then it is ensured that they are mirrored correctly.
Texture Animation
It is possible to animate textures, either linear by shifting the uv gradually or by jumping frames.
tex_animation = {
  fragmentProperties = {
    {
      uvSpeed = { 0, 0 },
      frameSize = { 0, 0 },
      frameSpeed = 0.0
    }
  }
}
For continuous animation, set uvSpeed values to something other than zero. The first value is the shift along x-axis of the texture, the second value is the shift along y-axis.
For frame based animations, the texture can contain a grid of frame sprites. The frameSize attribute contains the number of columns and rows. frameSpeed defines the speed for cycling through the frames in this grid.
If a material should be used with front and backside visible, twoSided has to be set to true. Keep in mind that this doubles the amount of polygons which have to be rendered. Use it carefully.
If a material with normal map is used in twoSided mode, flipNormal should be set to true too. Then it is ensured that they are mirrored correctly.
Window Light Color
To setup the illuminated surfaces, it is possible to configure two colors and the general switch on and off times:
window_light_color = {
  fragmentProperties = {
    {
      color1 = { 0.92, 0.81, 0.72 },
      color2 = { 0.9, 0.8, 0.7 },
      fromTime = -1,
      toTime = -1,
    }
  }
}
The colors are both Vec3 with ranges from 0.0 - 1.0, the times are within 0 - 24 or set to -1 to use the automatic calculation that is available for light sources and emissive materials too.
Types
There are over 40 different material types available, which can be divided in 4 characteristic groups:
Physical
| Prefix | Type | map_albedo | map_metal_gloss_ao | map_normal | map_ao | map_cblend | map_cblend_dirt_rust | map_dirt | map_dirt_normal | map_rust | map_rust_normal | map_op_1 | map_op_2 |
|---|---|---|---|---|---|---|---|---|---|---|---|---|---|
| P | PHYSICAL | ✔ | ✔ | ||||||||||
| PO | PHYSICAL_OP | ✔ | ✔ | ✔ | ✔ | ||||||||
| PN | PHYSICAL_NRML_MAP | ✔ | ✔ | ✔ | |||||||||
| PNC | PHYSICAL_NRML_MAP_CBLEND | ✔ | ✔ | ✔ | ✔ | ||||||||
| PNCD | PHYSICAL_NRML_MAP_CBLEND_DIRT | ✔ | ✔ | ✔ | ✔ | ✔ | ✔ | ✔ | ✔ | ||||
| PNO | PHYSICAL_NRML_MAP_OP | ✔ | ✔ | ✔ | ✔ | ✔ | |||||||
| PNCO | PHYSICAL_NRML_MAP_CBLEND_OP | ✔ | ✔ | ✔ | ✔ | ✔ | ✔ | ||||||
| PNUA | PHYSICAL_NRML_MAP_UV1_AO | ✔ | ✔ | ✔ | ✔ | ||||||||
| PNOUA | PHYSICAL_NRML_MAP_OP_UV1_AO | ✔ | ✔ | ✔ | ✔ | ✔ | ✔ | ||||||
| PNOUAM | PHYSICAL_NRML_MAP_OP_UV1_AO_MASK | ✔ | ✔ | ✔ | ✔ | ✔ | ✔ | ||||||
| PNODUAM | PHYSICAL_NRML_MAP_OP_DIRT_UV1_AO_MASK_DIRT_MASK | ✔ | ✔ | ✔ | ✔ | ✔ | ✔ | ✔ |
These materials do not have transparency. Depending on the exact material type, they support normalmaps, color blending, dirt and rust. It is possible to overlay another color map with the types supporting operations. Usually the physical materials are used everywhere, where no transparency is needed. This covers most of the buildings and assets as well as many parts of vehicles.
Physical with Transparency
| Prefix | Type | map_albedo_opacity | map_metal_gloss_ao | map_normal | map_cblend | map_cblend_dirt_rust | map_dirt | map_dirt_normal | map_rust | map_rust_normal | map_op_1 | map_op_2 |
|---|---|---|---|---|---|---|---|---|---|---|---|---|
| T | PHYS_TRANSPARENT | ✔ | ✔ | |||||||||
| TO | PHYS_TRANSPARENT_OP | ✔ | ✔ | ✔ | ✔ | |||||||
| TUO | PHYS_TRANSPARENT_UV1_OP | ✔ | ✔ | ✔ | ✔ | |||||||
| TN | PHYS_TRANSPARENT_NRML_MAP | ✔ | ✔ | ✔ | ||||||||
| TNO | PHYS_TRANSPARENT_NRML_MAP_OP | ✔ | ✔ | ✔ | ✔ | ✔ | ||||||
| TNS | PHYS_TRANSPARENT_NRML_MAP_SMOOTH_LOD | ✔ | ✔ | ✔ | ||||||||
| TNUO | PHYS_TRANSPARENT_NRML_MAP_UV1_OP | ✔ | ✔ | ✔ | ✔ | ✔ | ||||||
| TNUOS | PHYS_TRANSPARENT_NRML_MAP_UV1_OP_SMOOTH_LOD | ✔ | ✔ | ✔ | ✔ | ✔ | ||||||
| TNC | PHYS_TRANSPARENT_NRML_MAP_CBLEND | ✔ | ✔ | ✔ | ✔ | |||||||
| TNCD | PHYS_TRANSPARENT_NRML_MAP_CBLEND_DIRT | ✔ | ✔ | ✔ | ✔ | ✔ | ✔ | ✔ | ✔ |
These materials are almost the same as the non transparent physical materials, but they do have transparency. Depending on the exact material type, they support normalmaps, color blending, dirt and rust. It is possible to overlay another color map with the types supporting operations. Usually the pysical materials with transparency are used everywhere, where transparency is needed. This covers glass elements in assets, vehicle windows and assets like fences with ornaments.
Physical with Light
| Prefix | Type | map_albedo | map_albedo_opacity | map_metal_gloss_ao | map_normal | map_ao | map_op_1 | map_op_2 | map_id | map_lgt |
|---|---|---|---|---|---|---|---|---|---|---|
| PNL | PHYSICAL_NRML_MAP_LIGHT | ✔ | ✔ | ✔ | ✔ | ✔ | ||||
| PNOL | PHYSICAL_NRML_MAP_OP_LIGHT | ✔ | ✔ | ✔ | ✔ | ✔ | ✔ | ✔ | ||
| PNOUAL | PHYSICAL_NRML_MAP_OP_UV1_AO_LIGHT | ✔ | ✔ | ✔ | ✔ | ✔ | ✔ | ✔ | ✔ | |
| TNL | PHYS_TRANSPARENT_NRML_MAP_LIGHT | ✔ | ✔ | ✔ | ✔ | ✔ | ✔ | ✔ | ||
| TNOUAML | PHYS_TRANSPARENT_NRML_MAP_OP_UV1_AO_MASK_LIGHT | ✔ | ✔ | ✔ | ✔ | ✔ | ✔ | ✔ | ✔ |
These materials provide support for illuminated windows and are mostly used for town buildings, stations and industries.
Skinning
| Prefix | Type | map_color | map_albedo | map_albedo_opacity | map_metal_gloss_ao | map_normal | map_cblend | map_cblend_dirt_rust | map_dirt | map_dirt_normal | map_rust | map_rust_normal | map_op_1 | map_op_2 |
|---|---|---|---|---|---|---|---|---|---|---|---|---|---|---|
| S | SKINNING_TEXTURED | ✔ | ||||||||||||
| SC | SKINNING_PHYS_CBLEND4 | ✔ | ✔ | ✔ | ||||||||||
| SN | SKINNING_PHYS_NRML_MAP | ✔ | ✔ | ✔ | ||||||||||
| SNO | SKINNING_PHYS_NRML_MAP_OP | ✔ | ✔ | ✔ | ✔ | ✔ | ||||||||
| SNC | SKINNING_PHYS_NRML_MAP_CBLEND4 | ✔ | ✔ | ✔ | ✔ | |||||||||
| SNCD | SKINNING_PHYS_NRML_MAP_CBLEND_DIRT | ✔ | ✔ | ✔ | ✔ | ✔ | ✔ | ✔ | ✔ | |||||
| STN | SKINNING_PHYS_TRANSPARENT_NRML_MAP | ✔ | ✔ | ✔ | ||||||||||
| STNO | SKINNING_PHYS_TRANSPARENT_NRML_MAP_OP | ✔ | ✔ | ✔ | ✔ | ✔ | ||||||||
| STNC | SKINNING_PHYS_TRANSPARENT_NRML_MAP_CBLEND4 | ✔ | ✔ | ✔ | ✔ | |||||||||
| STNCD | SKINNING_PHYS_TRANSPARENT_NRML_MAP_CBLEND_DIRT | ✔ | ✔ | ✔ | ✔ | ✔ | ✔ | ✔ | ✔ | ✔ |
The skinning material types support the use of bones. This is usually used for the animals and character models but could be used for other purposes too. The materials with color blending support 4 different color maps, each in one of the four RGBA channels).
Skinned meshes assign every vertex to one or more of the bones with individual weights. Currently, it is possible to define up to 40 different bones for a mesh and assign each of the vertices to at most four of these 40 bones. The assignment is done in the 3D modelling software and then stored into the .msh.blob data when imported for Transport Fever 3. If a bone is transformed by an animation ingame, the vertices assigned to this bone are influenced depending on their weight.
Other Types
| Prefix | Type | map_color_alpha | map_emissive | map_normal | map_albedo_gloss | map_op_1 | map_op_2 |
|---|---|---|---|---|---|---|---|
| B | BILLBOARD | ✔ | ✔ | ||||
| BM | BILLBOARD_MULTI | ✔ | ✔ | ||||
| E | EMISSIVE | ✔ | |||||
| SE | SKINNED_EMISSIVE | ✔ | |||||
| L | LEAF_CARD | ✔ | ✔ | ||||
| PG | PHYSICAL_GLOSS_ONLY | ✔ | |||||
| POG | PHYSICAL_OP_GLOSS_ONLY | ✔ | ✔ | ✔ |
Billboard materials are used for far distant lod levels of trees. Emissive material is used for any light source. Leaf Card is used for leaves of trees.
Tips for Transparency
Transparent materials can result in some difficulties ingame, for example invisible objects through glass.
Render Order
When some element should be rendered, it is checked if it is in direct sight of the camera or not. As soon as an already rendered material is in the way, it is not rendered anymore. This is irrelevant for opaque materials, but as soon as there are transparent materials, this is relevant because even though there is an object obstructing direct sight, the camera can see through it. It is important to make sure that the material behind the glass is rendered first then. In general, the non transparent material types are rendered before the transparent ones.
If there are two materials of the same type, the rendering order can be forced by setting the order value to a number below or above the default value 0.
An example where this is relevant are vehicles with an interior and exterior material of the same type. The interior material could be set to order = -1 to force it to be rendered before the outer windows which use the exterior material.
Transparency Mode

no cutout

cutout grid effect

cutout grid effect (3× zoom)
If it is not possible to solve an issue by using order, e.g. because the conflicting materials are of a different type and the default rendering order is inverse to the need, the issue might be solved by using some other techniques. One is by using the cutout mode. The original purpose of cutout mode is to actually pretend that fully transparent areas are like air and do not show any pyhsical effects like reflection. This would for example be used for finegrained railings or vegetation leaves that are realised by a flat face and texture. The space between metal bars is then cut out.
When cutout is set to true, the transparent materials do not cover the entire surface with an alpha gradient, but have small transparent holes inside of them to emulate the transparency. While it is possible to see materials behind it shining through, the pixelized grid effect is a disadvantage of this technique. As the image on the right shows, there are certain degrees of transparency which do not have a visible grid pattern around 0%, 25%, 50%, 75% and 100% transparency, but any transparency level in between show some pixel artifacts.
An other option is to use proper sorting of meshes. To sort the faces by their position to the camera, the sorted property can be used. Then the distance between origin of the meshes and the camera is used to decide the order. As this increases the number of draw calls significantly, it is not recommended to use this attribute when not needed or for LODs.
Z-Buffer

default order, cutout technique, polygon offset
Another technique to change rendering order is by tweaking the z-buffer. The z-Buffer determines the nearest objects from the camera by cycling through all objects that lay in the axis of the viewport direction for the currently rendered pixel and remembering an object, if it is nearer then the nearest one remembered before.
By using the polygon_offset parameters, polygons using such a material are virtually offsetted along the viewport direction axis so that they are placed behind another object in the virtual stack for calculation.
An exemplaric use case would be headlights of locomotives behind glas. The image on the right shows a comparison to the default case and the cutout technique described above. Keep in mind that any changes to the z-buffering may have unintended side effects.
To test the several transparency settings, you can use another model that is in the material demo from above. You can download it here too.